After looking at Craigslist, thrift stores, garage sales and a flea market, both Friday and Saturday for a used inexpensive dining set for our formal area, Sunday afternoon we found it!
We woke up Sunday morning and went to church and then went out to lunch. Afterwards we came home and my hubby turned on Football... which I admit I am actually into this year because we are playing Fantasy Football with some family and friends. While we were watching the game, I was on my laptop and decided to search Craigslist again. This is the third day in a row I had searched our county and I didn't expect to find anything new. I was only searching our county because we pretty much would have to rent a truck to get anything home, as we only own cars. After about 10 minutes of searching the Furniture for Sale by Owner section I came across a French Country style table that had three extention leaves, 7 chairs (odd number, but I only needed 6) and it even came with the custom pads to protect it. I originally had wanted to find something for $100, but this table was listed for $200. It didn't take long for my hubby and I to decide we needed to go look at it. We called the seller and the table was still available. They lived about 20 miles away. We headed out immediately, hit the ATM on the way for some cash, all the while hoping it looked as good in person as the pictures.
We knew that if we were to purchase the set, we would have to rent a truck to get it home. Truck rental $19.95, plus mileage at $1 per mile (which is what our local rental yard charges) after driving to and from the sellers house with a rental truck would be a 40 mile round trip, plus another 7 or so miles getting the truck returned to the rental yard... and then we'd have to buy gas for the truck to replace the gas we used and of course sales tax on the truck.. about $80 later we could pick up the table and chairs and get it home. Ouch... maybe we need a truck of our own.
I knew that $200 would be a bit over my original budget especially if we had to rent a truck too... but, we were hoping for the best and figured maybe the seller would negotiate. When we arrived they opened their garage and the chairs were sitting in the bed of a pick up truck... hmmm, hopefully ready to deliver it for us (hehe)... The table and chairs definitely need an overhaul... In fact a full blown rehab to get it to look the way I want... But a renovation project is what we were looking for. The table and the three leaves are made from solid wood, which is a rare find these days. The set is incredibly well made. The chairs are very comfortable, have great padding on them and they even have springs in the seats (which we discovered after we got home). When have you ever seen springs in dining chairs? Originally I thought I'd be trying to negotiate on the price, but this set, being solid wood, was definitely worth the $200 they were asking. I said to the seller, if you are willing to deliver it, we will pay full price. They were thrilled and so were we!
I can't believe we set out to find a dining set for our formal area on Friday, and by Sunday we had found it and had it at home... All for $200. A little over our original budget, but completely worth it! Now we are starting our plans for a complete DIY overhaul. My husband will be sanding the table down to bare wood. The chairs will all get a light sanding (heavier where there are chips and knicks), then they will get primed and painted. I will re-upholster them, after I find the perfect fabric. Jim and I are both excited for this project. We have been in our home for 15 months now and our current formal dining room table is a 6 foot folding plastic banquet table, with some outdoor plastic chairs... Hmmm.... once we are done, this set will be an amazing upgrade!
Pictures of our project in process will follow soon...
Flea Market Finds
 Here are the items I found this past weekend at the flea market. All nine items cost a total of $27. I have planned uses for all of them as I mentioned in my prior posting. A few of them need to be cleaned up and/or painted before I display them in our home... When I am done with them they will all be spectacular. However, the wire basket I am using exactly as found (minus the little bit of dust).
 I first thought of putting the wire basket above my kitchen cabinets where I have vintage and antique items displayed. I also thought I might mount it to the wall in my pantry or my laundry room and use it like a shelf to display small items. The potential uses were unlimited. However, once I got it home, I immediately thought of using it on my coffee table to store magazines and books. As soon as I put a couple of magazines inside and saw how well they fit, that was the winner. I put a fabric placemat that matches our decor underneath it to provide contrast against the dark table. I love how the basket looks in the room and I love the character and charm the piece adds!
When decorating your home, try to think outside of the box as to uses for unexpected items you may find. I love thrift stores, garage sales and flea markets as you never know what you might find. If you haven't gone to any lately, try going to one. You might be surprised how many cool things are actually there. Just be willing to look through a little junk to find your treasures.
Our Day At The Flea Market
My husband and I spent Saturday morning and early afternoon visiting garage sales and a local flea market in search of a dining table and chairs for our formal dining room. I am hoping to find something vintage and sturdy made from solid wood... something that we can DIY rehab that will last for many years. The first few garage sales we hit were a total bust... and then I found a "garage sale" sign with an arrow that I followed for a couple of miles only to discover there were not any more signs posted. It is so so frustrating when people leave up old signs and after much looking there is not a garage sale anywhere in site. People... please, when the garage sale is over, please remove the signs!
Next we proceeded to our local flea market/swap meet. The outdoor market is a mixture of vendors with new items and used items. On Saturday there are probably 50 or so spots rented out to people with vintage items and garage sale type items. We saw everything from toys, to kitchen appliances, old rotary telephones, miscellaneous tools, glassware, furniture and lots of junk that I don't know why anyone would buy... But I guess one mans junk is another mans treasure.
Unfortunately, when it came to dining furniture we saw a few items that we wouldn't have taken even if they were given to us for free! I did find nine vintage items worth purchasing while we were there, so it wasn't a total loss. The days adventure plus the nine items only cost me $27 which is amazing considering what all I got. I found three old copper tea kettles that are all different styles ($5 for all three), which I will put in my kitchen on top of my cabinets where I have a display of vintage and antique kitchen items. I got an old wire basket that I just had to have for only $5. My husband has no clue what I see in the wire basket, but I absolutely love and I have plans for it (picture to come in the future). I found an old oval mirror with an ornate frame, which I will paint, it was $7. I found a crystal compote/bowl that is elevated on a pedestal with a bobeche that has crystal prisms dangling from it (only $5, great deal). A couple of the prisms were missing and the bottom screw is loose so it sits crooked, but we can easily fix it. I figure it will look amazing once it is cleaned up and I replace the few missing prisms. I plan to display it for Christmas with some glass ball ornaments inside the bowl, probably on my dining room table (once I actually find the table and my hubby refinishes it... hehe). The last three items were $5 total. They are old glass covers that were somehow used in electricity many years ago... I don't know exactly what they are called but they were cool and interesting and I wanted them. I like glass and shiny items as they reflect light and look pretty when displayed. They will probably end up displayed on my bookshelves.
All and all, we had a very nice day and I scored a few more decor items for our house... After a little elbow grease they will each be beautiful! Our search for a formal dining table and chairs still continues.
Hunting For A Dining Table
Today I started searching for an inexpensive dining table for our formal area that I can DIY renovate and turn into something beautiful. I have searched Craigslist and a few thrift stores. Tomorrow morning we are going to a few garage sales and a local flea market. I think I want a rectangle table and 6 chairs, that will extend to hold up to 8 chairs. Weather or not the chairs will all match depends on what I find. I am hoping to find something under $100 that has good bones. It might be wishful thinking, but I think I can find it. The big question is whether or not I will find it in time for Thanksgiving. I will post the status and pictures of what I find... and of my DIY project as it progresses.
The Fall Front Porch
 Yeah, we finally have a front porch. The house we bought last year has a front porch and I so love to decorate it. I find that decorating the front porch can be so much fun and it makes a home very inviting. I especiall love Fall decorations because the colors are so beautiful. You can keep Fall decorations up pretty much from the beginning of October through Thanksgiving (or until you put up your Christmas decorations). I found several photos that helped to inspire me with ideas for my Fall front porch. I hope you get inspired too!
Pumpkins, gourds, fall leaves and fall berries all give great color and decoration to the porch. They each last a long time on the porch as long as the aren't carved (note: when you carve a pumkin it only lasts a few days). I love using vintage pieces that add character to the porch, like the one shown here.


I love black mixed in with the fall colors. Black provides such a great contrast to the orange of the pumkins and the other fall colors. Mental note: I really want a pair of those rustic urns in the back :) I think I want that front door too... Imagine how pretty this porch would be at night with all of those candles lit. Love it!


Scarecrows and hay are often used in fall decor. Above is a great example mixed with pumkins and some nice fall flowers. Decorating the steps is a nice way to add layers and depth to the porch decor.


These lantens with pumpkins would also work well on a table both indoors or outdoors.
Fall leaves would also look amazing filling a lantern or sitting below the candles.

If you have a rear porch or back yard that you frequent, remember you can decorate it too.
Have fun with it... and Happy decorating!!!
Decorating With Chocolate
Chocolate brown is a beautiful color to decorate with. It combines well with several colors. I especially like chocolate with either blues, greens, pinks or creams. Below are some photos showing how stunning decorating with the color chocolate brown can be.


Christmas Decorating Ideas Site
Sorry I haven't blogged for the past few days. I have been setting up a Christmas decorating ideas site and working on the design template for it. If you like viewing lots of Christmas pictures of both indoor and outdoor holiday decorating visit my Tumblr site: www.ChristmasDecorating.tumblr.com
DIY Holiday Craft - Mason Jar Snowglobes
Easy DIY craft... All you need is
a jar with lid, super glue, glitter and water.
Oh, and something cute to put
inside :)

 I absolutely love this craft idea! DIY Christmas and holiday snowglobes in mason jars
Another great suggestion I recently came across is to glue a lego to the inside of the lid and one to the main item (figurine) that you want in the bottle... That way you can change out the figurine to anything you want whenever you desire, or for each holiday, just by having a connecting lego on each item.

 If you are wondering where to get jars, I have included links below to mason jars by the case. They come in variable sizes are very reasonably priced. Happy crafting!
Only 69 Days till Christmas
Lately I've found myself getting excited and inspired for Christmas decorating. After all, Christmas is now only 69 days away. I hope these pictures bring you ideas and inspirations for this coming Christmas season. I will post many more pictures as Christmas gets closer.

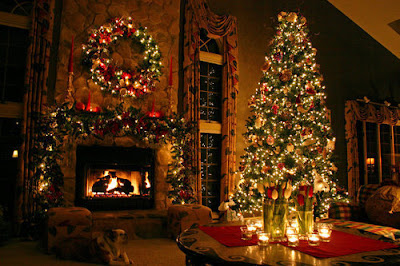


(photos via: tumblr.com)
Add some sparkle and bling to your Christmas decorations with acrylic and crystal ornaments. The acrylic ornaments give great sparkle and are much more budget friendly... The real crystal ornaments are much more expensive but are collectibles and are absolutely stunning! Happy decorating...
Paint, paint and more paint
There are many things you can do to spruce up a room when decorating on a tight budget. Paint is probably the least expensive way to decorate and it adds instant color to your space. Painting a focal wall (just the main wall) can really add a pop of color without overdoing it... Painting only one wall is fast and only costs $10 to $15 for the paint.
We moved into a brand new house just over a year ago. The entire house was filled with white walls. Let me tell you, having all white walls gets old and boring pretty fast! I don't paint many bold colors in my home, as I prefer my pops of color to be in my accessories, but I did still needed some color on our walls. My husband is amazing! I am so lucky that he does not mind doing weekend projects for me. Our first project in the house, a couple of days after we moved in, was to paint our family room fireplace wall and the back wall of our television niche. Within a couple of weeks we painted the main dining room wall and our entryway wall, both in a sage green. For me, the nice thing about painting just a couple of walls in a space is that I can easily change them whenever I get bored, or have my husband change them for me (lucky me).
I must admit that in the year we have been in our home I've had my husband paint our entire master bedroom twice now. The great thing is that the paint for the entire room was only $25. So painting a second time was not too expensive. There first round of paint in our bedroom, about six months ago, I had picked a very generic beige color. I quickly got bored with it so this past weekend I had him paint the room an aqua blue. I absolutely love the new color! I am not yet posting pictures of it because it is still very much a work in progress. I am refinishing a few pieces of vintage furniture and finding some new accessories. I hope to post pictures in a couple of weeks.
I am sharing this story because I learned a huge lesson about not settling. I originally wanted to paint aqua in our master bedroom. Six months ago, the first time we painted, I had completely chickened out thinking it was too much of a commitment so instead I had chosen beige. That was a big mistake! Every day when I looked at the walls I was disappointed. There was nothing wrong with the beige, it just wasn't what I truly wanted. So when I comes to paint, GO FOR IT... Paint the color you really want!
Add Color and Life to Plain Walls
 Often when you rent an apartment or a home the landlord won't allow you to paint the walls. Or, if you are allowed to paint the walls, they must be painted back to white before you move out, which can be a hassle.
Living with plain walls can get boring! The good news is there are several easy ways to add color and impact to your walls without too much labor or cost. You can use lightweight wall board or a art canvas, then paint it any color you like. They are quite easy to hang and you can take them with you when you move. Also, a way to add huge impact and is to find a graphic or print fabric that you love and use a staple gun to fasten it to a canvas frame or a lightweight board. If you want a soft padded look you can use batting beneath the fabric. Be sure to pull the fabric firm around the edges of your frame and staple on the back so you don't see fabric edges. This same technique can be used to create an inexpensive custom headboard.

(photo sources: pinkpaperpeonies.tumblr, roomu.net)
Chalk Board Paint - DIY Fun
 I absolutely love chalk board paint! There are so many great ideas for all the things you can do with it... Chalkboard Paint


(photo sources: lifemadepretty.tumblr, ideenagi.tumblr, linenlaceandpearl.tumblr, clairepeeptoo.tumblr, serindipitous-life.tumblr, ramblyblog.com, rickrackblogspot.com, ritapitabita.tumblr, weloveindie.com)

Chalk Art Murals
 I have recently been amazed by some of the great ideas of different things you can do with chalkboard paint. However, these pictures go above and beyond anything I've ever dreamed of! The below chalk murals are by Brooklyn artist Dana Tanamachi. She is so creative and so talented. These murals are simply amazing!!! There is a link at the bottom where you can visit her site and even watch videos of her doing her chalk art.


Subscribe to:
Posts (Atom)