Showing posts with label Flea Market Finds. Show all posts

How to Apply Antique Glaze

Have you ever wondered how to add an antique glaze finish to something?  It is really very easy. I found this vintage frame at my local flea market for just $7. I love the great gesso detailing. It is the perfect kind of detail that antique glaze will help to show off!  

A very simplified description of how to antique glaze would be: slosh it on then wipe it off...  It really is that easy!  

But here are the step by step instructions with a few important tips you should know.


First, it is best to glaze over a satin or a semigloss paint.  Note: You don't want to apply glaze to a flat or matte paint finish, as flat paint is porous and it would absorb too much of the color pigment.  Satin paint is my favorite as it is low sheen and it is easy to wipe and work the glaze into the crevices and details.  My frame was a gilded gold when I found it.  First I painted it with a coat of cheap primer and then I used Rust-Oleum Spray Paint in Satin Heirloom White. This paint is one of my absolute favorite colors as it is a very clean off white color. I love to use it on furniture and accessories!  It can be found in both spray paint and also by the quart. 

     
The picture above is the frame sprayed with heirloom white before I applied the antiquing glaze to it. The above picture is a good shot for showing how clean the off white color is.


Notice on the pictures below that my frame has lots of age cracks and crevices in the old gesso details. I wanted to make sure all of the details and even the age of the item showed... as I find the distressed age so beautiful! That is why I decided to go with the antique glaze on this beauty. It helps to show off all the wonderful details...


I had some Valspar (Lowe's) Antiquing Glaze from a prior project so that is what I used.  It is a water based product so it is easy to use and easy to clean up.  I use a paper plate as a palette (the place to pour some glaze to dip my sponge or brush into).  It's cheap, but I mostly use it because it's super easy to clean up (which I love!).  I just throw the paper plate away when I'm done.  I also often use sponge brushes as they are like .39 cents each so they are disposable too.


Just pour some of the antiquing glaze onto the plate/palette and sponge away. I used a fan bristle brush to get the glaze into the smaller details. Any brush would work, I just like my fan brush for some reason.

First i did a small section as a sample test area.  I just brushed the glaze on, then waited a couple of minutes. Glaze usually gives you a good 10 or so minutes to work with and wipe off.


After a couple of minutes, wipe off the glaze (with a soft dry cloth, I like microfiber... don't use your good dish towels, the glaze will stain, I keep some craft towels around that I rinse, wash and re-use).  Keep wiping until you achieve a look that you like.  Once you get too much glaze on a section of your towel, you may need to turn or fold the towel to another clean section on it (I hope that made sense). Your towel will wipe off glaze more easily if the area on the towel you are wiping with if fairly clean.  If doing a huge project, you may want to have more than one wipe towel on hand.  It literally took less than 20 seconds to get to this look.


Next I generously applied glaze down the side of the frame to a larger area now that I had a feel for how easy it was.  It is however always a good idea to work in smaller sections rather than doing an entire piece all at once.


After this, I did the same brush on, wait a few minutes, wipe off... section by section.  I just love the way it started looking!


I got brave on this bottom corner and did a larger section.  Then I got a phone call which required me to leave my project and go into another room to handle something. It kept me away from my project for 25 or 30 minutes. I was a bit worried that the glaze might not wipe off evenly since I had waited so long. I was right, it didn't want to wipe off as easily, but I just wet a towel, wrung it out, then wiped off the glaze as before. The moisture on the towel softened up the glaze allowing me to wipe it easily... (Thank God!)


Note: If I were doing a furniture piece with a glaze.  I would seal it with a polyeurethane (clear finish) over it to protect it (as glaze can scrape off or scratch). Being that my frame will be hanging on a wall, I didn't feel the need to clear coat it.

Here it is... My finished Frame after applying the antique glaze. I absolutely love how it turned out!


Until next time,
Happy decorating!

Diana


Flea Market Fun Finds - Look What I Found


We hadn't been to our local flea market in several weeks.  I'm so glad that yesterday morning we decided to make a trip to see what we could find.  I found two vintage beauties... and the amazing part is I spent only $35.  It was only ten dollars for the old wood and gesso frame and $25 for the dresser.  I believe they are both antiques.  They both need a little TLC, but I got them for a steal!


The frame has beautiful ornate details.  It is currently painted an ugly high gloss white and some of the antique gesso is chipped off.  I will give this beauty a makeover by painting it Heirloom White (with a satin finish) and then give it an antique glaze to enhance all of the details.


I haven't decided exactly what I will do with the dresser yet.  I have a few ideas, but I'm thinking I might try something new with this one.  I usually go for a shabby cottage white (safe), but I'm thinking of maybe putting some color on this one.  Possibly aqua :) 


I love shopping at flea markets!  You never know what you will find and there are so many great deals to be found :)

Until next time,
Happy decorating!

Diana


Flea Market Mirror Makeover (Before & After)


I found two mirrors at our local flea market (swap meet) for a total price of $8 ($3 and $5).  The frames are both made from some sort of poured plastic mold.  Vintage frames made from a mixture of plastic and resin are a common find at flea markets, yard sales and thrift stores.  You can find upcycled painted versions of these on eBay, Etsy and in vintage/antique stores for anywhere from $25 to $200.  I definitely prefer the budget (cheap and before paint) versions and then painting them myself!  Many of the vintage plastic frame mirrors I have come across were made by Syroco, Burwood and Homeco.  Most of them from the 70's and 80's, but some do date back even further.

These two mirrors are each a good size.  The larger one measures approximately 32" tall x 18" wide.  In their gold finishes they look cheap and plastic!  However, don't ever let plastic stop you from buying.  Remember, a can of spray paint can transform just about anything!  I've said it many times, I love what you can do with a few dollars and a little bit of paint.  It took me awhile to decide what color I wanted to paint them... But I decided to go with a flat black.  I've never done black on accessories before and I decided I wanted to do a black and white mirror and photo wall up our stairwell, so black it was.  Below is a picture of the mirrors as found.  The gold on both of these looks way better in the picture than it actually did in person.  They both were really ugly!!! 


Yesterday I removed the backs from the mirrors and separated the frames from them for easy painting. I gave them two coats of spray paint and allowed them to dry.  After the spray paint was dry (overnight), I distressed a little on the edging and details with a sandpaper sponge block.  Any sandpaper would work.  I just happen to like working with the sponge type because they are easy to hold.  You can get these sanding blocks at most home improvement stores for $3 or $4.


As the above photo says, this is just the start of my vintage mirror and black and white photo collage wall.  I have a few more mirrors and vintage frames to paint and then I need to find a few photos that I want to display.  This wall is large and it will be a work in progress for awhile, but I will share my progress with you.  I wasn't able to get good close up pictures of the mirrors on the wall.  However, as the project continues I will work on getting better close ups of them.

Until next time,
Happy decorating :)

Diana


Sharing at:
Domestically Speaking - Power of Paint Party

So Many Projects - So Little Time

Today I set out to makeover a couple of vintage mirrors that I found at the flea market awhile back.  I was all excited about getting a project started and finished today.  I even shared a comment on my Facebook blog page that said I was working on a flea market makeover and planned on having it posted by tonight.  


So why does it seem that other things always come up and get in the way, making it impossible to finish a project in a timely manner?  Everything takes longer than I ever expect it to!  I'm not complaining, it just seems like I have so many projects and yet so little time.  It wasn't even that big of a project... It should have been easy to accomplish this little task.  But, nope... It's not finished yet.
 
I was at home getting started on my project when just after 10:30 a.m. I heard the garage door opening.  On any other day, I don't hear the garage open until 5:30 or 6:00 p.m.  My poor hubby came home from work totally sick... with a fever, hacking up a lung (or two).  Poor thing sounds horrible, he looks horrible and of course, he feels horrible.  It's definitely upper respiratory.  His breathing is a bit labored and the constant coughing just won't stop.  

I finally helped him get settled.  Gave him some Tylenol and another medication with cough suppressant and expectorant.  And he actually managed to fall asleep for awhile.  Okay, good.... Now back to my project.

I had taken apart my two vintage mirrors.  The frames are both a plastic molded frame that had a back screwed on... so it was easy to remove the backing and the mirror, separating the frames from the mirrors for easy painting.  This way is so much easier than taping off the mirrors.  I then cleaned the frames removing all of the dirt and dust.  I used a dry paint brush to remove dust from the crevices.  Then just used a damp rag to wipe them down. 

Out to my garage/shop area and into my homemade paint booth.  If you haven't seen my paint booth, you can see it and read how we made it HERE.  Yeah, I love to paint!  Coat number one, then let it dry... an hour later a second coat of paint.  Tip: doing two thinner coats of paint and allowing it to dry in between helps to prevent any drips from occurring.  
 
This is where the project took a halt.  I ended my hubby to the doctors around 2:30 and did not get home until almost 6:00.   Needless to say, the project will not be complete until tomorrow.  Even if I finished it tonight, I would not be able to get good pictures since it's too dark.  Pictures in daylight are always better!

So tomorrow, God willing, I will get my finished mirrors put back together, hung on the wall and hopefully get good pictures of them to share with all of you.  What color will they be?  You'll just have to wait and see :)

Until then...
Happy decorating!

Diana     


Vintage Mirror Wall Using Flea Market Finds


I've gotten many vintage mirrors and picture frames from my local flea market. Mirrors and frames depending on their size and quality usually run anywhere from $1 to $7 at the flea market in our town.  I love getting such great deals!  They usually need a bit of cleaning up or painting, but they have so much charm and character, I love them!  These mirrors each measure over two feet tall.  This first picture has a larger full length mirror (black frame) on the left.  I am not keeping this particular mirror as the frame is too thick, but I do like the idea of having a taller mirror in the bedroom so I can see myself full length when I get ready.


When finding vintage pieces at flea markets, swap meets, yard sales and thrift stores, try to look past the ugly paint colors and finishes on frames or the ugly pictures in the frames.  You can always paint the frame and remove the pictures.  Here are a few frames that I found that had pictures and glass in them.  After I removed the pictures, they looked so much better!


I played with the different mirrors and frames on the wall quite a bit.  I moved them around into different positions until I finally decided on a look that I like.  This picture was the first look I tried.  It felt a bit too triangular for my preference.

I removed the bottom oval frame and I liked the layout better but felt like something was still missing.  


This is the what I finally came up with.  I like the way the wall currently looks (except the black mirror on the left side).  I do want to keep a tall mirror on the left, but I need to find one with a thinner frame and most likely in white.  It may take awhile to find the right mirror, so for now, this is how I am keeping it (because it functions well).  I can actually see what I am wearing from head to toe for the first time in over 2 years.


My next bedroom makeover project is that wood cabinet (armoire and bookshelves) you see at the left of the pictures.  I am working on painting it and distressing it.  I should be able to reveal it sometime next week.

Until then,
Happy decorating!

Diana

Steal of a DEAL - 6" Baseboard & Wood Trim SALE

Check out this amazing deal we got on tall baseboards and wood casings.  We got 224 feet of new trim molding for just $90 total.  This is approximately 70% less than it would have cost us at a home improvement store!  We saved more than $200 (yippee... I love a good deal)!


We have a small flea market/swap meet here in Beaumont California every weekend.  This wood trim vendor has been selling at the same location every single Saturday for over four years.  She has a good selection and the prices are unbelievable!  I've never seen molding deals like this!  Even the thickest moldings run under 50 cents per foot.  She has plenty of stock to pull from if we ever need huge quantity from her.  The moldings all come in 8' lengths.  The shorter lengths do make a little more work when installing (due to extra seams)... but for these prices it is so worth it!!!  Plus our little SUV only holds the 8' lengths so they are perfect for us :)

We will be going back for crown molding soon.  I can get crown molding for the entire bedroom for under $40... Amazing!!!


We got all of our baseboard and casing home and put it into our paintbooth.  Then it took awhile to figure out our new paint gun.  You have to thin the paint so it flows properly out of the gun.  It took a few tries, and a little patience but we finally got it right.  Now that we know how, painting projects will be so much easier in the future!


After we sprayed the moldings we moved them to a plastic sheet drop cloth on our garage floor to finish drying.  That way we had more room in the paint booth to spray more pieces.  All of the trim is now primed, painted and ready to install.  The paint finish looks so professional... I'm lovin it!


Next we are painting our bedroom a light silver sage color and doing a wood wall treatment on one of the walls... After that we can install these new moldings.

More pictures of our makeover progress to come soon.

Until next time,
Happy decorating!

"HONEY STOP THE CAR" - Second Chances Barn Sale

On a recent visit to my parents house, driving through a somewhat remote area of Southern California, on our way to breakfast I saw this place...  I wanted to yell "STOP THE CAR".  But I knew that wouldn't go over too well with my dad.  Plus giving him a heart attack by yelling might not have been a good idea.  I was totally yelling in my head though!!!  I said to my husband, look at that place, I have to go there.  Just driving by I saw so many fun pieces I could hardly stand it!  My hubby suggested I go back there after we had breakfast and dropped my dad at home.  Luckily this place was only about 10 minutes from my parents house, so I was definitely going back!  A couple of hours later I grabbed my sister in law and I was back at "Second Chances Barn" in Fallbrook California.  They have tons of vintage and antique furniture pieces, garden and home decor accessories.  Some have been upcycled, others need work, and many were stunning in their weathered vintage condition.  This kind of place makes me so so happy :)

In years past I had visited and shopped the Fallbrook Barn Sale Trail which was held a couple of times a year in a handful of different barns all over the town.  It was so much fun but I hadn't heard anything about it in quite awhile.  I was completely thrilled to come across this place because I do love me a barn sale!    

Just walking up this property I saw so many great pieces that I would love to own and I got some great ideas from!


The property has hundreds of vintage items outside and a few sheds full of pieces before you even get inside the huge barn.


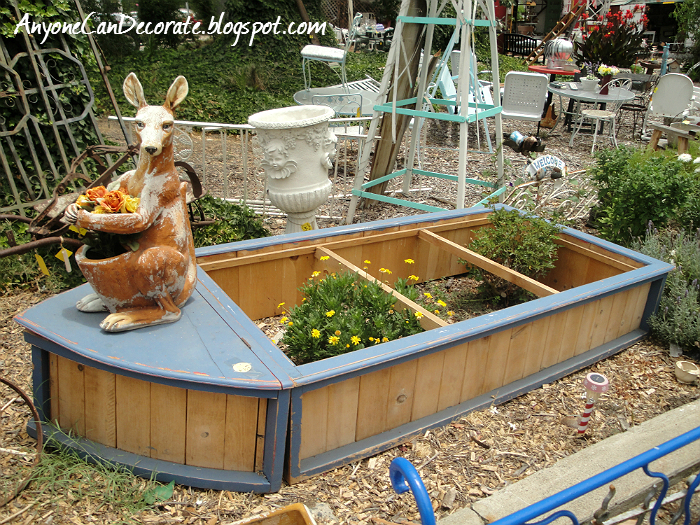
It's awesome when you see an item that gives you amazing inspiration for a fun project.  I think this kids boat bed-frame would be so much fun in the yard used as a raised vegetable garden!  The front hinged storage chest would be a great place to shed all of the small garden tools and gardening supplies.  If I had a larger yard, this would have come home with me.


These vintage and antique chandeliers had lots of potential.  They were priced from $40 to $55 each which is not a steal, but is still pretty reasonable!  The prices at the barn all varied from low to high.  Since they have a variety of vendors displaying their wares all over the property, you can find some really great deals here.


The interior of the barn had one huge room and a few side rooms.  They were all completely full of items... even many hanging from the ceiling.  I loved seeing all of the vintage chairs they had to offer. 


This place has so much stuff around every corner, you could seriously decorate and entire home nicely from just this one barn sale!


There is definitely something for everyone here!  I spent about 45 minutes on the property, but if I had more time I could have spent a few hours here.  For me I felt like a kid in a candy store.  Although I didn't buy anything on this visit, I did see a few pieces that I am definitely interested in.  If I had the money, I could definitely do some damage at this place!!!


There is a cute blue headboard bench in this next picture.  Some day I want to make one of these...  It's definitely on my list of someday crafts!


Second Chances Barn is located at 3137 South Mission Road in Fallbrook, California (Southern San Diego County).  They are open daily from 10-5 and Sunday from 10-4.  If you are ever in the area, I definitely recommend a visit!