Showing posts with label get organized. Show all posts

Spring Cleaning and Getting Organized

Every Spring I get motivated to do a bit of extra Spring cleaning and do some kind of organizing project. It seems there is always something that needs to be organized!  Since we recently condensed from two houses to one, I have a much larger than normal amount of things that I need to find places for. My living room is currently looking like a hoarders paradise (which I'm not proud of) but it's my current reality!... I'm definitely in need of having a huge garage sale!

I've got so much stuff right now that I'm feeling a bit overwhelmed. I'm not sure yet what my next organizing project will be, but in the meantime I wanted to share one of my favorite organization projects with you. It's my garage organizer. I love how it keeps that part of the house neat and orderly!

Most garage organization systems are pretty expensive so I came up with the idea to build our own.  The pictures pretty much speak for themselves, but I will note a few comments explaining how with built it along the way.


We started our DIY wall organizer by marking all of the studs in the wall and mounting a frame to them. 


Once the frame was built, my husband painted it and then mounted the wire shelves. I wanted the wire shelving so dust would build up on the shelves.


We added a section of peg board for miscellaneous small items.


A few smaller shelves and hooks hold gardening supplies and other items.


My favorite part of our organizer is these next shelves that we made from vinyl rain gutters.  They are perfect for holding cans of spray paint, tubes of caulking and other small items.  Love them!!! 


Hanging our ladders and other items at the front of the garage freed up so much floor space!


We have allot of wood trim and molding that needs to be stored flat. It used to be on the floor (always in the way), now it is up out of the way on the shelves.


We now park both of our cars in the garage and get out of our vehicles without stumbling and tripping on things.  It is wonderful!  I love being organized!!! Now I just need to do the rest of the house :)


Until next time,

Diana

My Most Popular Blog Post - Greeting Card Organizer

As a blogger it's so much fun to see what posts people like and visit the most.  In this past year my most popular blog post has been this Greeting Card Organizer.  


It's obvious that many people like great ideas on how to get organized and this was one of my best: 

Organized Craft Space - Greeting Card Organizer

I like to keep a variety of greeting cards on hand. They are so much cheaper to purchase in a box assortment than they are buying them individually! Did you know that if you bargain shop you can buy an entire box of 12 to 24 greeting cards for between $5 and $10? When buying just one greeting card can cost $4 or $5, it is much cheaper to buy them by the box! It is also super convenient to always have them on hand. I keep an assortment of blank cards as well because I like crafting handmade cards myself. I had never had one specific spot to keep all of my cards, so I was on a mission to find a way to organize them and this is what I came up with. 


I found this great clear organizer box with dividers on-line.  It is the perfect size for what I needed for all of my cards.  If you are interested in getting your own you can view it for purchase HERE.


I decided I wanted to create a label on my box with Chalkboard Contact Paper and a Liquid Chalk Marker.  I love the chalkboard contact paper because you can write on it, erase it and write again... cut it (or use your Cricut or Silhouette Craft Cutter) and cut it into any fun shape you like.  The contact paper sticks well but also can be easily removed when needed.  It works great on canisters in the pantry, arts and craft jars and organizers and so many more things...  Chalkboard labels in the kids room are super cute too!  Okay, okay, so I went off on a tangent... Now, back to my project :)


I love using Liquid Chalk Markers because the writing does not smudge when you touch it unless you wipe it with something damp or wet.  


I didn't like my writing the first time, so I erased it and re-wrote what I wanted in cursive.


We have an old little p-Touch Personal Label Machine by Brother that I used to label the inside dividers. You can purchase these label makers for under $20. I've had mine for several years and it really comes in handy!


Having all of these greeting cards and craft cards organized will make it so much easier to find my cards when I need them!  It's amazing to me that this little bit of organization makes me feel so accomplished :)  


I like that this box easy to see and recognize no matter where I put it.  I have labeled the top and front so I will notice it even if it is in a stack of goodies!  I think I am going to get another one or two of these to sort crafting stickers and items that I have piled around my craft room (yes, I have piles, doesn't everyone???).  I like that I can stack several of them on top of one another and still see what is in them.  


I'm feeling so inspired after this project!  Now I just need to find the energy to organize the rest of the house :)  Anyone wanna help me?

Update: I am still organizing the house. I think it is a never ending process!!!  I have purchased a second one of these card organizer files as my card library has grown. I am loving having cards on hand no matter what the occasion!

I hope this simple project inspires you to get organized.

Until next time,
Happy decorating and happy organizing!

Blessings,
Diana

Custom Garage Organizer on a Budget

Recently as I was browsing on Pinterest I was inspired to organize our garage.  Most of the garage organization systems that are out there are pretty expensive.  So I showed my hubby a few budget friendly ideas and the next day we were at the Home Depot buying parts to build our own garage organizer system.  For the most part the pictures can speak for themselves. But I will note a few comments along the way.


Before getting organized we did park our cars in the garage, but it was a challenge opening the doors!


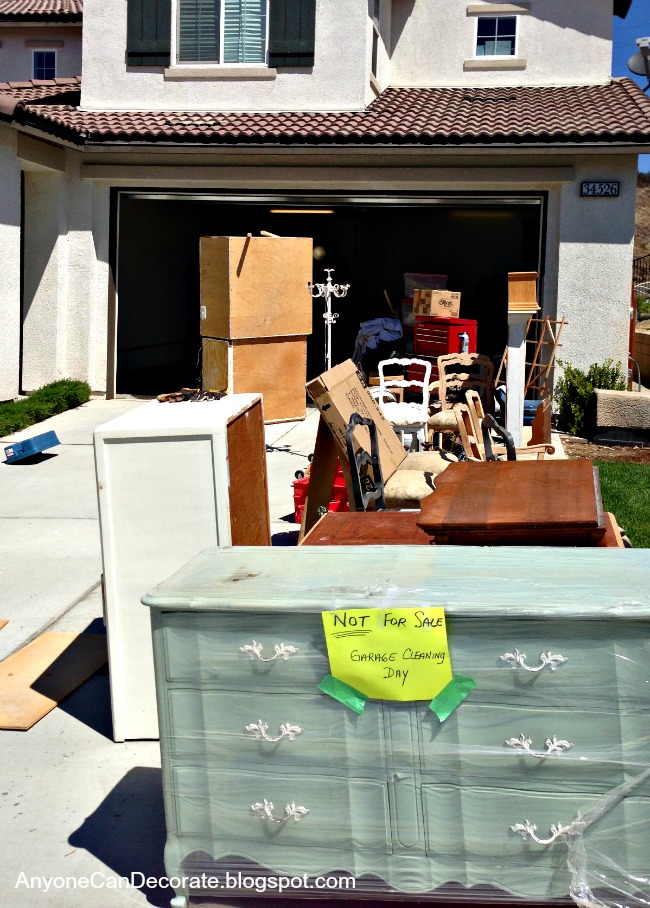
We started by gutting the left side of our garage... which ended up making the driveway look like a  rather fun yard sale.  I had to post a sign at the front that read "Not for Sale, Garage Cleaning Day".


If you are wondering how we get all of that in our garage plus our two cars... It's because our garage is extra deep.


Back by the water heater you can see our woodworking bench that my husband built.  The chop saw is attached to it.  Every time we cut a piece of wood in the garage the saw dust flies everywhere.  As we cleaned out the garage, my hubby decided to put wheels on it so we could roll it out to the driveway from now on when anything needs to be cut.  This will keep the garage much cleaner! 


The addition of the wheels makes this so much more useful!  Now our drill press is attached to the bench too.


We started our DIY wall organizer by marking all of the studs in the wall and mounting a frame to them. 


Once the frame was built, Jim painted it and then started mounting shelves.  I wanted wire shelving so dust would not sit on the shelves.


We added a section of peg board for miscellaneous small items.


A few smaller shelves and hooks hold gardening supplies and other items.


My favorite part of our organizer is these next shelves that we made from vinyl rain gutters.  They are perfect for holding cans of spray paint, tubes of caulking and other small items.  Love them!!! 


Hanging our ladders and other items at the front of the garage freed up so much floor space!


We have allot of wood trim and molding that needs to be stored flat. It used to be on the floor (always in the way), now it is up out of the way on the shelves.


We can now park both of our cars in the garage and get out of our vehicles without stumbling and tripping on things.  It is wonderful!  I love being organized!!!


Until next time,

Diana

Simple Shelves - Huge Help Getting Organized

I love this simple storage solution!  


We moved into our home a bit over two years ago now.  I must admit that we are guilty of having many boxes that were never unpacked.  Our office closet had about 12 boxes full of junk that were just buried inside (behind the closed doors).  This past weekend my husband decided to go through all of the boxes (God bless him)!  After he was done, probably half of the stuff was trash (I have no idea why when we moved we brought some of this stuff/trash with us?).  About 1/4 of the stuff we donated and the last quarter of it was a bunch of office supplies that we had no place to store.  Since office supplies aren't pretty to look at inside the room and we had no sort of closed storage, I came up with the idea to put some kind of shelving into the closet.  We both started thinking about what we could buy or design or create for the closet.  My husband remembered that we had some wall tracks and brackets from an old closet organizer system at our last house.  They were just sitting in our garage unused.  We just needed to go buy shelving materials.  We headed to Home Depot and found some eight foot melamine boards (15" deep) with finished edges that we thought would work perfect in the closet.  We bought two of the boards, had them each cut into four foot lengths and brought them home to install.  

After we got home, my husband Jim got out his level, electric drill and some wall anchors... he found the studs, marked the wall and mounted the brackets all in about 20 minutes.  We added the brackets and placed the shelves on top of them.  It was that simple!  From start to finish, this project took less than 30 minutes to install.  The cost was only $35 for all of the shelving (since the brackets were just collecting dust in our garage, they were free).   I can't believe we didn't think of this sooner!


It is nothing fancy, but in the closet it doesn't need to be... I am loving the vertical storage!  Now I think I want to do the same kind of shelving in my craft room closet and maybe a wall in my master walk in closet.  The simple storage solution is an awesome way to organize much of the chaos!!!

Until next time,
Happy decorating... (or in this case, happy organizing)

Diana

Organized Craft Space - Greeting Card Organizer

I am working on organizing my craft room (since lately it has looked more like a junk storage room).  Today's project was organizing all of my greeting cards and blank crafting cards and their envelopes.  I like having a variety of greeting cards on hand for a few reasons.  The main reason being this: purchasing a box card assortment is WAY cheaper than buying individual cards one at a time.  Did you know that you can buy an entire box of 24 greeting cards for between $5 and $10???  Buying just one greeting card at the store is usually about $4 or $5.  It is much cheaper and super convenient to always have them on hand.  I also have an assortment of blank cards because I like crafting handmade cards myself.  I've never had one specific spot to keep all of my cards, so I was on a mission to find a way to organize them (and make them easy to find in my mess)!!!


I found this great clear organizer box with dividers on-line.  It is the perfect size for what I needed for all of my cards.  If you are interested in getting your own you can view it for purchase HERE.


I decided I wanted to create a label on my box with Chalkboard Contact Paper and a Liquid Chalk Marker.  I love the chalkboard contact paper because you can write on it, erase it and write again... cut it (or use your Cricut or Silhouette Craft Cutter) and cut it into any fun shape you like.  The contact paper sticks well but also can be easily removed when needed.  It works great on canisters in the pantry, arts and craft jars and organizers and so many more things...  Chalkboard labels in the kids room are super cute too!  Okay, okay, so I went off on a tangent... Now, back to my project :)


I love using Liquid Chalk Markers because the writing does not smudge when you touch it unless you wipe it with something damp or wet.  


I didn't like my writing the first time, so I erased it and re-wrote what I wanted in cursive.


We have an old little p-Touch Personal Labeler Machine by Brother that I used to label the inside dividers.  You can purchase these label makers under $20.  I've had mine for several years and it really comes in handy!


Having all of these greeting cards and craft cards organized will make it so much easier to find my cards when I need them!  It's amazing to me that this little bit of organization makes me feel so accomplished :)  


I like that this box easy to see and recognize no matter where I put it.  I have labeled the top and front so I will notice it even if it is in a stack of goodies!  I think I am going to get another one or two of these to sort crafting stickers and items that I have piled around my craft room (yes, I have piles, doesn't everyone???).  I like that I can stack several of them on top of one another and still see what is in them.  


I'm feeling so inspired after this project!  Now I just need to find the energy to organize the rest of the house :)  Anyone wanna help me?


Linking up -
Organizing Home Life
My Uncommon Slice of Suburbia
Days of Chalk and Chocolate
Savvy Southern Style
Organize and Decorate Everything