 Today I am working on a great easy DIY project so I thought I'd share it and show you how easy it is to apply antiquing glaze to any item. I am showing you on a great frame that I found at my local flea market for only $7. It is an old wooden frame that has lots of great gesso detailing. The application process for applying glaze is the same whether it's on a picture frame, a piece of furniture or on your kitchen cabinetry. A simplified description of how it is done would be: slosh it on then wipe it off... It really is that easy! But here are the step by step instructions with a few important tips you should know.
 First, you should always glaze over a satin or a semigloss paint. Note: You don't want to apply glaze to a flat or matte paint finish, as flat paint is porous and it would absorb too much of the color pigment. Satin paint is my favorite as it is low sheen and it is easy to wipe and work the glaze into the crevices and details. My frame was a gilded gold when I found it. I first painted it with cheap primer and then with Rustoleum Spray Paint in Satin Heirloom White. This paint is one of my absolute favorite colors as it is a very clean off white color. I love to use it on furniture! It can be found in both spray paint and also by the quart. It can sometimes be found at hardware stores, but they rarely seem to have it in stock. (The spray can on the right links to Amazon where you can buy a case of 6 spray cans of paint for only $22). If you do a lot of projects, I recommend buying it in quantity as it is cheaper that way! The can below links to the quart which is great for furniture project. I usually roll it on with a sponge roller (I love sponges.. lol).
The picture above is the frame sprayed with heirloom white before I applied the antiquing glaze to it. The above picture is a good shot for showing how clean the off white color is.

Notice on the pictures below that my frame has lots of age cracks and crevices in the old gesso details. I wanted to make sure all of the details and even the age of the item showed... as I find the distressed age so beautiful! That is why I decided to go with the antique glaze on this beauty. It helps to show all the wonderful details...
.


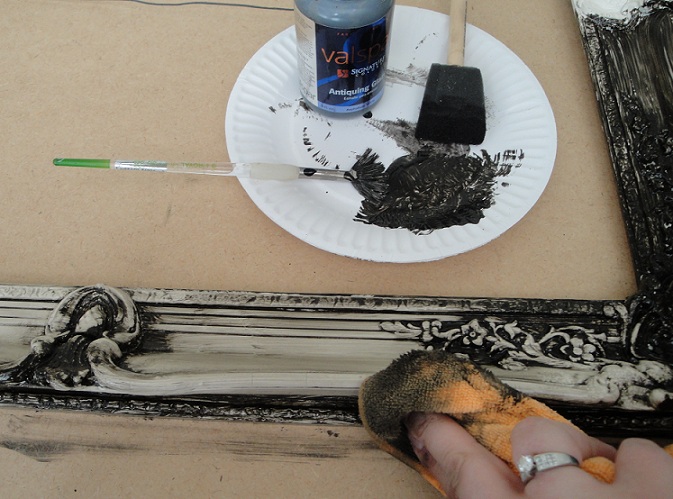
I had some Valspar (Lowe's) Antiquing Glaze from a prior project so that is what I used. It is a water based product so it is easy to use and easy to clean up. I use a paper plate as a palette (the place to pour some glaze to dip my sponge or brush into). It's cheap, but I mostly use it because it's super easy to clean up (which I love!). I just throw the paper plate away when I'm done. I also often use sponge brushes as they are like .39 cents each so they are disposable too.

Just pour some antiquing glaze onto the plate/palette and sponge away. I also used a fan brush to get the glaze into the smaller details. Any brush would work, I just like my fan brush for some reason.
First i did a small section as a sample test area. Just brushed the glaze on, then waited a couple of minutes. Glaze usually gives you a good 10 or so minutes to wipe off and work with.

After a couple of minutes, wipe off the glaze (with a soft dry cloth, I like microfiber... don't use your good dish towels, the glaze will stain, I keep some craft towels around that I rinse, wash and re-use). Keep wiping until you achieve a look that you like. Once you get too much glaze on a section of your towel, you may need to turn or fold the towel to another clean section on it (I hope that made sense). Your towel will wipe off glaze more easily if the area on the towel you are wiping with if fairly clean. If doing a huge project, you may want to have more than one wipe towel on hand. It literally took less than 20 seconds to get to this look.

Next I generously applied glaze down the side of the frame to a larger area now that I had a feel for how easy it was. It is however always a good idea to work in smaller sections rather than doing an entire piece all at once.

After this, I did the same brush on, wait a few minutes, wipe off... section by section. I just love the way it started looking!

I got brave on this bottom corner and did a larger section. Then I got a phone call which required me to leave my project and go into another room to handle something. It kept me away from my project for 25 or 30 minutes. I was a bit worried that the glaze might not wipe off evenly since I had waited so long. I was right, it didn't want to wipe off as easily, but I just wet a towel, wrung it out, then wiped off the glaze as before. The moisture on the towel softened up the glaze allowing me to wipe it easily... (Thank you God!)


Note: If I were doing a furniture piece with a glaze. I would seal it with a polyeurethane (clear finish) over it to protect it (as glaze can scrape off or scratch). Being that my frame will be hanging on a wall, I don't feel the need to clear coat it.
Here it is... My finished Frame after applying the antique glaze. I absolutely love how it turned out!

I have always wanted to do this...I love that look! Thanks for sharing!
ReplyDeleteHave blessed day,
Patty
Finally! Someone that tells us WHAT TYPE OF PAINT you should glaze over and NOT glaze over!! Thank you!!
ReplyDeleteThis is a wonderful, straight forward DIY how to! It came out beautiful. I am going to do this with one of my frames. Thank You!
ReplyDeleteadahliavolk.com
Thank you for the straightforward, helpful how-to diy. I also very much appreciated the info regarding where to get the valspar (they don't carry it many places where I"m from), and what paints are good to use. Thanks again!
ReplyDeleteThank you so much for this post. I have been wanting to do this. With your post I will feel more confident~
ReplyDeleteWell done, thanks for sharing...
ReplyDeleteAwesome! I've been searching and searching, and you've given a clear answer on how to glaze and over what paint. I've read a lot about waxing and tinting wax, however was concerned about having to reapply wax/wear for a headboard. Thank you thank you!!!
ReplyDeleteThank you so much, I am in the process of chalk painting my kitchen table just could not get the glaze right. The instructions were to apply before a wax type product. After reading this I see my problem thank goodness it was just the underside of the table. Thank you oh so very much. You saved my project and my sanity.
ReplyDeleteI want to re-glaze an old Chinese Red coffee table, what should I use to clean the surface before I attempt to re-glaze, my grandchildren have loved scratching up the top, sides and bottom, now they
ReplyDeleteare grown and I want to enjoy my table again hopefully without scratches....with your help ofcourse.....
Thanks, Diana
i'm so sorry I didn't see this comment before. For some reason I never received notification of it. Anyways, I'm really not sure what you would use to clean it first. I would recommend asking at the paint counter of your local home improvement store. They would be able to direct you to what would work best!
DeleteBlessings,
Diana
Can I use this over the top of the Valspar 4000 paint?It's kind of like a oil base paint.
ReplyDeleteOn something like a picture frame it would work fine. If it is on a piece of furniture or something that is used/handled, I'm honestly not sure how well it would hold up. I would ask at the paint counter of my local home improvement store. That is where I bought my glaze.
DeleteBlessings,
Diana
Would this technique work on a cast stone fireplace?
ReplyDeleteI honestly don't know how well it would work/hold up on stone. I would ask questions at the paint counter of my local home improvement or paint store. They should be able to direct you to what product would work for you.
DeleteBest of luck!
Diana
great...great
ReplyDeleteNice job. I'm going to have to try that on one of my frames.
ReplyDeleteCan I use this technique and product on kitchen cabinets? I want to paint them and then antique them......do I need to seal them after antiquing? Thans
ReplyDeleteI did use flat paint for a project. I really wanted to obtain a sort of barn wood weathered appearance and becuase flat paint absorbs more a gel I easily got the finish I wanted. My advice to all is try it on a scrap piece of wood to ensure you will be getting what you want! Just be cureful when applying brush on polyurethane. It can start to move your antiquing gel! Spray is so much easier!!😀
ReplyDelete