My First Blog Video (Yikes).. Craft Room Makeover Update

I have decided to start making videos to better show you my decorating and DIY projects as I work on them and reveal them.  I will still have photos of my projects, but also video updates so you can fully see and hear about what I am working on.  

Yesterday I decided to shoot a sample video to see if I was even capable of creating something interesting without stuttering all over the place (lol)... I didn't plan on my first attempt at making a video to be something I would actually publish...  Hence, the hair in a ponytail with a baseball cap and lack of makeup.  I was not necessarily what I would call  "camera ready".  But since I surprised myself that I actually could talk to the camera and make sense...  I decided to go ahead and post my first video.  

Today I figured out how to made a few little edits to the video, created a YouTube Channel and posted the video on both my YouTube channel and here on my blog.  I feel so accomplished :)

My YouTube Channel is also called "Anyone Can Decorate".  I have posted just the one video so far... To view my first video and view the makeover that has been going on in my craft room just click below.   Note: If you click the title at the top of the video it will open a larger version of the video on a separate YouTube page.  


If for some reason you can't see the video... you can click this link to see it: my first YouTube video

In the video I mentioned that I would post the links for the ribbon organizer and tool organizers that I love so much... So if anyone is looking for those items, here are the links to them:  Ribbon Organizer and Tool Organizer.

I'm so excited about my entire craft room.  It is currently about half way done and is still a work in progress... but so far I am loving it!
I would love it if you would subscribe to my new YouTube channel to catch all of my future content.
Until next time,

Happy decorating!

Diana

Simple No Sew Bunting Flag - Valentines Day

I love bunting flags.  This is a simple tutorial that shows how I made this cute Valentine's decoration a couple of years ago.  It's one of my favorite craft projects and wanted to share it with all of you.

Have you ever wanted to make bunting flags? I think that they are completely adorable!  However, being that I'm not much of a sewer (not at all), I had never given it a try.  So I made this cute bunting flag banner for Valentines Day.  It was a super EASY craft project that anyone can do!  And the good thing is that there is zero sewing involved :)


The idea for this project started when I found this old vintage book of sheet music at an Antique/Collectible store in town for a few dollars.  The book isn't an antique, but is vintage and was in excellent condition.  I went to Joann's Craft Superstore and found a box of foam hearts that included glitter lettering (the foam cut hearts were on sale of course, I always love me a good sale!).  I already had ribbon in my personal craft stock here at home.  The only other items I needed besides what is in this next picture was clear tape and glue.


I started by tearing out nine pages from the music book.  I had decided to use an odd number of pages so I would have one hanging directly in the center.  I planned to put a note on the center flag so I needed one in the center (I hope that made sense)...


After tearing out the pages, I cut a straight edge down the side that was torn.  Then I cut and trimmed all of the excess edging around the music.  I made one page as a template for size and then I cut the remaining pages to the same size.


Next I softly folded a few pages at once (without creasing), then I proceeded to cut the bottom off (as shown below)...


I did the same to all of the pages using my first cut piece as a template guide for the remainder of them.


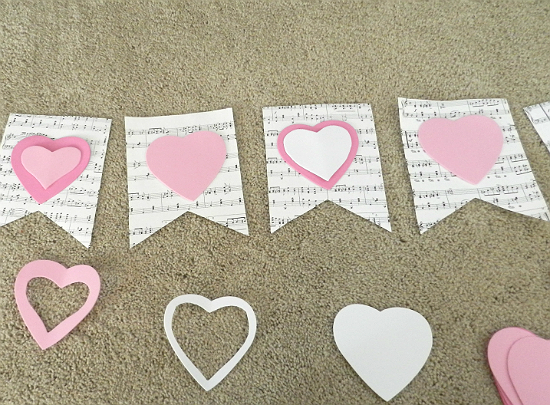
Next, I laid the pages across my floor and placed hearts across them, with dark pink and light pink alternating.  I decided I wanted something a little more decorative than just the alternating colors, so I proceeded to cut out smaller hearts from additional white and light pink hearts.  I folded the foam in half and cut my smaller hearts from the larger ones.  After laying out my pattern, I decided I would lay out my text for the white center heart.


I decided to put the words "Be Mine" on the center heart using the glitter letters that came with the package of hearts.


Next I looked at my two different shades of pink ribbon before deciding to use the dark pink.  I like the contrast between the darker pink and the white paper.  At this point nothing was glued yet.  Everything is just sitting in place so I could see if I liked the look... (which I did!).


I used clear packaging tape fasten the ribbon to the back of each page.  (Note: music was printed on both sides of each page, which is why you see me taping to music).  I left the ribbon slightly below the top of the page so the tape had  paper to adhere to, both above and below the ribbon.  I put about 1 1/2 inches of spacing between each of the flags.


After fastening all of the pages, I turned over the entire project so I was now looking at the front.


I used my multipurpose craft glue and smeared a bit on the back of each heart and then just eyeballed what looked like the center and fastened each one.  It is a home made craft project so it doesn't have to be perfect...  It is made with love and is supposed to look a little home made :)


So here is it, my finished project.  I love how it turned out!  This is a simple and fun DIY craft that anyone can do.  You can even include the kids on it...  Sometimes kids come up with amazing ideas!  Have fun and be
 creative with it.


I would love to hear about your projects!


Until next time...
Happy decorating!


Craft Happy - Another Peek at My Craft Room Makeover

I'm making a ton of progress in my craft room.  We have installed a peg board above my work table and some additional organizers for ribbons and small stuff.  I love these organizers!  I got both the Ribbon Organizer and the Tool Organizer.  I've still got a ways to go before revealing the entire craft room to you, but I wanted to share how awesome these little organizers are... I got four of them running across the top of my work table, just below my new peg board.  


I love that I can now see all of my craft supplies!


Craft Room Overhaul - Sneak Peek

Here is a sneak peek of what is happening in my craft room.  The picture isn't great as it is from my cell phone, but you can see that I am getting organized... and when I am done, I will be able to actually do crafts in my craft room!  


On New Years Day I mentioned that we are giving my craft room (which has pretty much been my storage/hoarding room for over a year now) a complete clean-out and makeover.  A few inexpensive storage and organizing systems are going in and I am working at getting through all of the collectibles (lol... clutter).  When I get further along in the progress I will share some before and after pictures.  The before pictures of the room are so scary that I don't want to scare anyone away :)  

The transformation is already amazing, but there is a long way to go...  Seriously I had like 40 boxes of stuff to go through...  I have been making piles to trash, donate and keep... and if it's something I want to keep, I then get to figure out how/where it is going to go in the room.  If I don't have room for it, I can't keep it.  

It will be a couple of weeks before the project is complete, but it will be worth it!


Happy New Year

Happy 2014 everyone!  We have been busy over the holidays visiting with friends and family.  We had a very blessed Christmas and a wonderful New Years.  I hope you all did too!

We kicked off 2014 with a big project!  The attemp to make sense of my craft (AKA: storage room).  It had gotten so full that I could hardly see the floor.  After removing almost everything from the room, today we put in a few organizer systems.  I am so excited to be able to find things when I need them! I will be sharing pictures of our progress in a few days.  I feel I need to have some "after" pictures to show you prior to scaring you with the "before" pictures.  I had so much stuff I was seriously beginning to look like a major hoarder.  

Actually my mother has been cleaning her house of all excess craft supplies and "collectibles" for the past 15 months or so.  Every time I see her I end up with several more boxes of "stuff" that she says I have to "have".  I love her dearly and I'm sure most of it is great stuff.  This week I am finally going to open and go through it all.  Then I will decide what to keep and what to donate.  I need to somehow make it all fit, otherwise I just can't keep it.  Opening all of  the boxes should be like opening more Christmas presents.  I know there are many treasures in them.  I will be sure to share photos of some of the hidden treasures I find with you.

Blessings,
Diana