Pondering Sandy - Praying for All Affected by the Frankenstorm

I can't bring myself to do any of my home decorating or craft projects today!  I am totally engrossed in reading blog after blog from people who have lived through and/or are suffering the wrath of Sandy.  Whether we call it a hurricane, a cyclone or a tropical storm, Sandy is a bitch!!!  

(Please forgive the language, but I can't think of a more appropriate name)


Some of the stories I've read are heartwarming and touching where people have been pulling together and helping one another... While other stories are very tough to read as people are losing their homes and all of their earthly possessions.  Most people evacuated their homes so they and their family members are safe having made it to higher ground.  Others stayed in their homes to wait and fight it out, only to be trapped and surrounded by water.  On the news channels we are hearing stories of tragedy and unfortunately the death toll is slowly rising.  There are other inspiring stories from people who had a scary night but are safe, with their lives, homes and belongings having been spared.  No matter what the story, I feel deeply for each and every person and family that I've read about.  It's amazing that the internet and social media has given us the ability to connect on such a personal level.  

As I sit here on the West Coast, in our Southern California home, I almost feel guilty that our weather is so nice today.  It is hard to fathom what everyone in Sandy's path is going through.  While we might be thinking about what we are going to make for dinner tonight or what we will wear tomorrow, those in the storms path are mostly in survival mode... watching, waiting, wondering or cleaning up and recovering from her mess.  Many are without power, without water and the typical conveniences that we so often take for granted.  Those that have lost their homes are wondering where they will live and how they will go forward.  Some have insurance and will be able to rebuild while many others have no insurance and nothing to fall back on. 

I want to help, but I don't know what I can do from here other than pray for those that are suffering and for those that are scared.  I pray that God meet each and every one of you where you are and help you in your time of need... that He put a hedge of protection around you and help you all through this difficult time.

Our thoughts and our prayers are with you.  If anyone needs specific prayer, please feel free to ask via the comments section.

Blessings,
Diana

DIY Candy Treats for the Little Ones

A couple of weeks ago my daughter Britney and I made some fun Fall & Halloween Sweets and Treats for her to take to work. One of the ladies at her work loved them so much that she hired her to make some Chocolate Covered Marshmallow treat pops for her child's kindergarten class.  So we spent Sunday making these adorable cuties...  


We had to make 60 total, so we went with two styles... Jack-o-lantern Pumpkins and Frankensteins. Since they both have a face we think kids will like them.


We individually wrapped each treat and then tied a piece of orange yarn around them in a bow.  Hopefully the bow will make it easy for a child to open.


I think they are rather cute and that they will be a big hit with the kids!!!  I sure hope so :)


We had some extra melted Chocolate so I also made some pretzel treats... Why not?  We couldn't waste it, right?!!!

I often mention my family on my blog but I don't usually share many pictures of em... So, here are some pictures of my daughter Britney yesterday while we were working (and messing around) in the kitchen.
 She doesn't really wear glasses, she was wearing them from her "GEEK" costume from the night before...  I actually think the glasses look cute on her :)  Plus she loves being a dork!  A very lovable dork, but none the less a big goofy dork :)


Thanks for letting me share!

Until next time,
Diana
 -xo-


Sharing at the following linky parties:
You Are Talking Too Much

DIY'd Wood Panel Wall - Master Makeover Progress Report


Our Master Bedroom makeover has made allot of progress.  All of the construction type projects are finally complete (yeah!).  The project is taking a bit longer than I had thought it would.  But then again, I think projects always take longer than we expect!  
  
We have recently finished the Faux Wood Panel Wall, installation of 6" baseboards and we've painted the room a light silver sage color.  I wanted a wood plank/panel wall to add texture and architectural interest in the room.  Being that wood is very expensive these days.  I came up with a way to get the look of expensive tongue and groove paneled walls, but without the high cost!  This wood panel wall cost only $44 and a bit of DIY labor.

Here is how we achieved the high end look on a tight budget.  We bought  four utility grade 4' x 8' sheets of underlayment ply (thin plywood) from Home Depot for only $11.17 each.  It took four sheets to do this wall.  My hubby is a Veteran (Marine Corp.) so we got a 10% discount, which covered our tax and took a few cents off too.  So the wood wall only cost $44... I love a bargain!!! 

We had Home Depot cut the panels into 6" wide planks for us.  Cutting/ripping wood is a free service that Home Depot does, which made our job so so so much easier!!!  The boards being eight feet tall were perfect for our bedroom walls since our upstairs ceilings are exactly eight feet tall.


The thickness of the boards is less than 1/4 inch.  We used a piece of a cut board to create the spacing between the wood planks on the wall.  We used our nail gun to adhere the planks to the wall.  Board after board we went across the wall until we were finished.


My husband, Jim cut around the windows and electrical sockets with a jigsaw.  I of course made him go up and down the stairs each and every cut because I didn't want a bunch of dust in the house... and luckily he didn't complain!  This board is fairly easy to cut since it is thin.


Here is what the finished wall looks like after being painted in a light silver sage color.  The color inspiration came from the Restoration Hardware paint line.


I love how the finished wood wall looks!  Next I will be putting a collage of vintage mirrors and/or frames on this wall.  I will play with them a bit until I decide what looks best.


This next picture I took with the panorama feature on my new iPhone 5.  I love how I can get the entire room in one picture (so cool)!  This picture shows our progress so far.  


There are still several things to do in order to complete the bedroom makeover. We have already gotten curtains from Ikea for the large window wall.  I need to hem, iron and then hang them.  The armoire and bookshelves need to be painted and distressed.  We need to make and upholster the two headboards.  Also I have two pendant fixtures to make that will be going on the outer edge of the beds.  Although we finally have the room construction projects completed, we now have a bunch of furniture projects to do.  I will share each project with you as we progress...   

I do need your help with one thing...  I am looking for just the right bed linens.  I am thinking duvet covers, tailored dust ruffles and shams in a high thread count.  Probably in white, like most finer hotels have.  What do you think?  I'd love to hear your opinions and ideas.

Thanks a bunch!
Diana

Hot Tip - Make Fresh Cut Flowers Last Longer

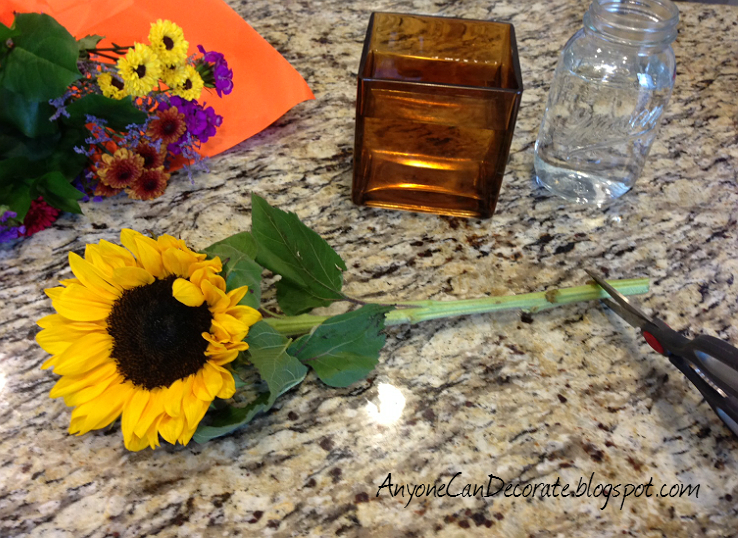
With this super easy trick your fresh cut flowers will last as much at 2 or even 3 weeks.  Over the years I've tried many things that are said to give fresh cut flowers longer life; things like pennies in the water, flower food, crushed aspirin, sugar, changing the water ever other day, and more... No matter what, the flowers always start looking bad in four or five days, and I throw them out at around the one week mark.  As expensive as fresh flowers can cost, I've always wished they could last much longer!


Now they can!  This trick, which is used by many designers, works better than any of the others I had tried before.  Here it is:  put just a few drops of bleach into the water/vase.  This prevents bacteria from growing in the water and killing the flowers.


I'm sure you have experienced the nasty smell of water in a vase after you've had flowers in it for a few days.  The flowers start looking bad and you can see slimy stuff growing on the glass an/or in the water.  That is all bacteria growing and it contributes to wilting the flowers quickly.  Even if you change the water every day, the bacteria is still growing on the floral stems so they end up dead way too fast!    

Just a few drops of bleach prevents the bacteria from developing.  Just be sure you only put three or four drops in each vase.  If you were to use too much bleach, then your flowers would go into shock and likely die.  It only takes a small amount to keep the water clean.


Also, you should always give your flowers a fresh cut at the bottom of the stems before putting them into your vase.  If you cut the stem at a slight angle the flower is able to suck up (absorb) even more water.

Your flowers will need additional water added as they drink it up.  I like to put in fresh water in the vase every couple of days.  Each time I change the water I again add a few drops of bleach.  With this method fresh cut flowers can last as much as two or three weeks.

Note: If you buy flowers that are not freshly cut (usually cheaper flowers from a grocery store or from a guy on a street corner) they may already have a slimy residue on their stems from having sat in water for several days already, this method will not work as well in that case since bacteria would have already gone up into their stems.  This method does work amazingly well when you cut flowers from your own garden or buy from a floral shop that gets them delivered fresh daily.  

My hubby got me these flowers yesterday.  He is such a sweetheart!  I ended up going with two mason jars to display them.  I figure you can never go wrong with mason jars!


Do you have any other tips you'd like to share?  I'd love to hear from you!

Blessings,
Diana

Easy DIY Sweets and Treats - Fall & Halloween

This weekend my daughter and I made a bunch of super easy DIY Fall and Halloween sweets and treats.


We wanted to spend a day making candy treats, but without much baking involved so we decided we would work with a few simple basics... Pretzels, marshmallows & Rice Krispy treats.  I admit I had never even made rice kripsy treats, but my daughter had and said they were super easy.

We started out our day by visiting our local craft store that has a cake/candy supply aisle.  We bought candy melts, sugar eyeballs, candy sprinkles, cellophane treat bags, food coloring markers and lollipop sticks.  Then we went to our local grocery store for the pretzels, rice krispies, marshmallows and butter.

She wanted to make enough for everyone at her work so we got allot!!!


If you haven't used candy melts before, they are super easy to use and tons of fun.  They come with simple melting and thinning instructions on the back of the package.  I put the melts in oven safe dishes, then use the microwave method to melt them.  Then I sit them in an electric skillet (on simmer), with 1" of water at the bottom of the skillet (to keep them melted melted and smooth to work with.  The water in the skillet keeps the melts from potentially burning at the bottom of the cups.


Making the rice krispy treats was so simple.  It only took about 5 minutes.  We decided this is by far the fastest and easiest treat ever to make!  With only three ingredients, Rice Krispies, butter and marshmallows, it was a cinch!


We used an edible food coloring marker to draw on our cute little Frankensteins and ghosts.


We dipped marshmallows to look like candy corn.  We first dipped the entire marshmallow in white.  Then put it in the refrigerator to harden the coating quickly, then came back and dipped the orange (harden), then the yellow at the bottom.


We put the candies onto wax paper while they hardened.  The wax paper removes easily from them.


We cut the rice krispy treats into triangles and then shaped them into the different things we wanted to make.  They are soft and pliable so it was easy to do.


Candied pretzels are super easy!  You just dip them in the cup of melted candy or chocolate or use a spoon to drizzle the candy onto them.  


Sprinkles are applied while the candy coating is wet (it holds them on like glue).  


This little Frankenstein is my favorite of all the treats we made.  My daughter actually made him and I think he is so cute!


After we were done making all of our candy treats and they had hardened, we put them into cellophane treat bags and tied a ribbon around each.  We had gotten a cake box to put them all in for my daughter to take them to work today.


During our day I tried not to eat too many, but I admit I did eat a few :)  Yummy!

I hope these super easy sweets and treats inspire you to make a few creations of your own.

Until next time...
Happy decorating!
  

Linkin up - 
Home Stories A to Z