 When you think of camping, do you think it's messy, dirty, uncomfortable, full of bugs and lacks any kind of luxury? Many women I know don't care to go camping unless they are in a nice motor-home or RV and most would probably rather just go to a nice hotel or resort. Well, I set out to show that camping can be very nice, in fact it was just the opposite of most peoples impressions of camping!!! Welcome to our DIY camping/Glamping trip...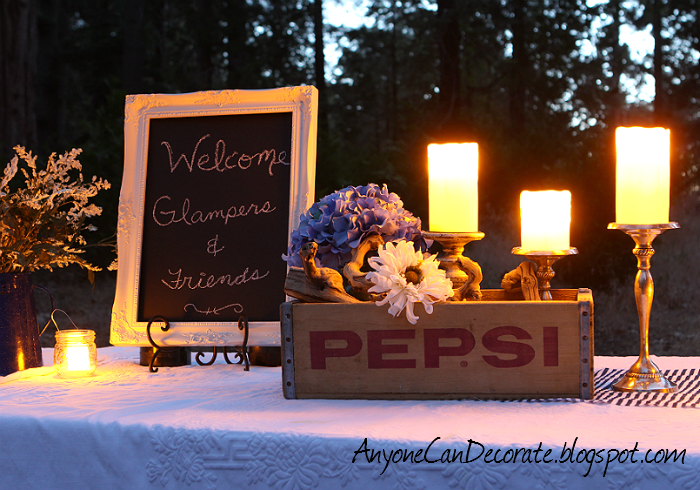

For our wedding anniversary we decided to go camping to one of our favorite spots in our local mountains, Lake Arrowhead.
Loving decorating as much as I do, I can't just go camping, so we decided to go GLAMPING... which translates to Glamorous Camping. For me "Glamping" means having all the comforts of home all around us and decorating our space with a comfortable homelike feel. My must haves included a comfy bed with nice linens... also, both a shower and a flushing toilet within a couple minutes walk and restaurants in the area so we didn't have to do our own cooking or dishes... oh, and lots and lots of candles!!!
Above is a picture of our car at the site after we had already unloaded about half of it's contents. I had it packed literally from top to bottom. Seriously, I could not have fit anything else inside!!! I had so much stuff packed and puzzled in every nook and cranny of our vehicle. Luckily my hubby never complained and is fully supportive of all my decorating craziness :)
I am going to post allot of pictures so you can get a feel for what it was like actually being there. I couldn't decide which pictures to post so I am going to share many. If you like what you see, I would love it if you could PIN them and share them with your friends!

A few minutes after we arrived at our campsite, my hubby got to putting up our tent. Below is a picture of it about 25 minutes later.


The wooden box below is an old grenade crate with rope handles that I found at a flea market for only $3. I've since seen them for sale on ETSY and eBay for anywhere from $50 to $150... I so love finding bargains for just a few dollars! I used the crate to transport all of my hanging mason jars and then was able to use it as a decorative piece at the camp site... love it!

This wall hanging birdcage was found at a thrift store for $3. I painted it, added some nesting material, hung a few sparkling crystal prisms from it and popped in a couple of battery operated tea-light candles into it. Since we were outdoors, I incorporated a few birdcages and birdhouses into the decor.


The weather was perfect and the view from our windows was stunning!

Having a bed off of the floor and having end tables when camping made it feel so much more like home! And it's a ton more comfortable!!! The wood end table on the left I found on clearance at Home Depot for just $11. It folds completely flat which made for easy transport. The little round table on the right I found at a vintage store. It was originally black, but I painted it white for that shabby cottage chic look.
I made this battery operated chandelier from a birdcage that I found for $10 at Marshalls, a strand of LED lights, some nesting material and a couple of faux candles that were also battery operated. I used to make and sell chandeliers via an eBay store so I already had a bunch of crystal prisms in my craft room that I decided to add hanging from it. It added a touch of romance to our tent. I really like the way it turned out.

Once we zipped up the windows we had complete privacy.


The entire campsite decor was initially inspired by this vintage wooden Pepsi box crate that I found at a flea market a few weeks ago. I paid just $5 for it, and with it I was inspired to go with a red, white and blue theme. Also being that 4th of July/Independence Day was close, I figured patriotic colors were appropriate.

Below is a wooden box that I added rose furniture appliques to and then I painted it heirloom white and distressed it for a shabby look. I added mason jars to it to and used them to hold our designer plastic silverware (hehe)...

I loved lighting the candles and chandelier as the sun went down. It added a warm glow and soft ambiance to our campsite. We were out in the forest with hundreds of huge trees and we had created our own wonderful romantic haven... It was our home for the weekend. My father said, "wow, so you can be homeless and still live in style".


The framed chalkboard was made from a vintage frame I found for just $2. I painted the frame heirloom white and then painted a backer board with black chalkboard paint. I love making my own chalkboards from inexpensive vintage finds!


Our favorite restaurant was only about 10 minutes away from where we camped, so the only cooking we did during our trip was make s'mores over the campfire. We toasted/roasted marshmallows until they were oooey and gooey, put them between two graham crackers and added a square of Hershey's chocolate in the middle, waited for it to melt together and then happily indulged. YUM!!!

I love this next picture of all the candles and the fire lit at our site. I'm probably sharing way too many pictures but there are so many I like that I couldn't help it!


As we sped around the lake we slowed down to see a few of the amazing homes that surround the lake. This little mountain cabin is available for $16,000,000. Okay, so it's a major mansion... but 16 million... That is crazy!!! But I do imagine it has an amazing view.

I have always thought this next place was incredibly awesome. It has a boat house directly under the house. So very cool!
Lake Arrowhead has a village that has lots of fun shops, restaurants, a grocery store and more. When you have a boat on the lake, you can take your boat to the village and dock while you shop, eat, stroll around the village and visit their summer concerts. That would be so much fun... You would never have to use your car. Imagine, just hop in your boat and run your errands.


Sunday morning we packed up our car like a puzzle filling each and every hole... We had a wonderful weekend and are looking forward to going glamping again at the end of summer.

Until next time...
Happy decorating!
I am sharing this post at the following blog parties:
Savvy Southern Style
Miss Mustard Seed
A Bowl Full of Lemons
Shabby Creek Cottage
I am sharing this post at the following blog parties:
Savvy Southern Style
Miss Mustard Seed
A Bowl Full of Lemons
Shabby Creek Cottage


