Showing posts with label painted furniture. Show all posts

DIY Painted Front Porch Chairs

Last year I found a pair of wood Adirondack chairs at the Home Depot for only $29 each. They came in a box and required assembly, but for $29 a piece they were a steal of a deal! Assembly was easy (especially since my hubby did it for me...)  
I decided to paint them a beautiful teal color to add a fun pop of color to our otherwise boring front yard...  I love their transformation and they look fabulous on our porch.


Until next time,
Happy decorating!

Diana

DIY Garage Spray Paint Booth

It's been almost two years since my husband built me this amazing paint booth in our garage. It is one of my favorite ever DIY projects.  It makes painting so much easier than it was outdoors. Being able to contain the paint dust to a small area is wonderful!  

We are very blessed to have a garage that is 40 feet deep. It allows us a to have a workshop, a paint booth, storage for all of our junk (my husband probably says it's all my junk), (but I call all that stuff "my treasures"), and we still have enough room to park both of our cars. 

I used to paint furniture by hand with just a brush and or roller, which takes forever!  For smaller items I would use a can of spray paint in our back yard (where often half of the paint would spray into the wind and then dust and bugs would fly into the paint) which was a major pain! 


After getting the idea for a paint booth from my dads workshop, my husband (did I mention he is amazing?) built me this paint booth in our garage. He used thick painters plastic for the walls, 2" x 2" wood strips to fasten the plastic to the ceiling across the top and also wood strips stapled at the bottom of each side (plastic sheet) to weight them down... Then Duck brand duct tape was wrapped onto the edges of the plastic to reinforce the edges. We then added Velcro (sticky back) down the side edges (on top of the duct tape) to seam/stick the edges together for when the booth is in use (sealing in the dust). The Velcro easily pulls apart for entrance and exit to the booth. We put a large canvas painters tarp on the floor (to protect it from the paint mess).  When the booth is not in use the sides can be rolled up and tied to the ceiling to get it out of the way.   

In this next picture you can see how well the Velcro holds the corners together which keeps the paint over-spray (paint dust) from getting all over the garage.


The paint booth measures 10 feet wide by 10 feet across and also has a 10 foot high ceiling.  The area has good overhead lighting which makes the space great for painting any time day or night. (So now in the middle of the night, when insomnia kicks in and I can't sleep I can just get up and paint... hehe).


The first piece we painted in the booth is this old small oak round table (which was ugly golden oak from about the 80's).  A coat of paint and it already looks so much better!  I must say that spray painting without the outdoor breeze blowing my paint away makes it so so so much easier!  And I no longer waste half of my paint.


The paint booth is built around the side door of the garage which is great  because when the weather is nice (which is almost always as we live in Southern California) I can open the door for some fresh air (ventilation of the paint fumes).


Note:  When spraying paint we always wear a mask (protective gear) so not to breath the fumes.  Also we open the side door for ventilation whenever the wind isn't blowing.

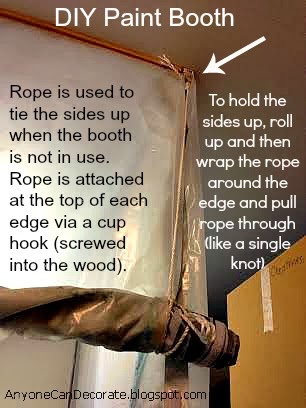
Rope is used on each edge to tie up the sides of the booth when it is not in use (see below).


Since we added the paint booth to our garage we have painted dozens and dozens of items in it. Some with a spray gun and some with cans of spray paint. Both work wonderfully in the booth and I'm loving it!

Until next time,

Happy decorating!


Thrifted Chair Makeover - Before and After

Here she is... My thift store chair that was previously screaming for a makeover... She is finally finished.  Isn't she pretty!


I found this chair at my local Goodwill Thrift Store for $30. I snapped this first picture of it in the store while I was debating on buying it.  When I first saw it, I knew it had a ton of potential, but I was a little unsure if I could handle making it over!  I sat in the chair for at least 20 minutes thinking about what I could do to it.  It was surprisingly very comfortable... and I needed a chair in our master bedroom.  I knew for sure that I didn't want to do tufting of any kind on my as this was my first real upholstery project.  And I wasn't sure exactly how I would accomplish fixing her up, but I decided it (she) was worth a try!

My first step was to remove the cushions from the chair. The bottom cushion removed easily as only two screws were holding it on. However, the rear cushion was stapled onto the chairs frame with hundreds of staples.  I painstakingly removed each and every staple by pulling them out with my needle nose pliers.  I had several blisters and a staple hole in my thumb to show for my hard work.

I already had white paint, dark wax and batting in my craft room left over from previous projects...  So the only things I had to purchase for this makeover were fabric and Nailhead Trim.  I estimate my supply costs to be $10 because I used less than 1/3 of the nail head trim and my fabric remnant was only a few dollars on sale at Joann's Superstore.  I can't help but shop in the bargain section!   

I had previously given a sneak peak of my chairs progress via my Instagram feed (My Instagram name: AnyoneCanDecorate).  That was before I decided how I was going to trim around the back cushion.  The staple gun staples were still exposed in this next Instagram picture. 


After giving the sneak peak on Instagram, I had a few people ask me for a tutorial on this piece... but honestly being that this was my first time doing upholstery I don't think that I'm the one to give a tutorial on how to upholster.  I purchased a book that showed me Step-by-Step Upholstery.  The book is how I figured out what I was doing.  It was definitely worth the few dollars it cost!

The back of the chair involved quite a bit more than just wrapping fabric around it like a present and stapling it.  I admit it was a little bit difficult but the book showed me enough to figure it out.  Going with a stripe fabric also presented a challenge.  A solid definitely would have required less effort.  

I'm not going to give you step by step tutorial here... I will give you the photo version of my progress as it happened and I will also tell you how I achieved the antiqued paint finish.  

After removing all of the old fabric, cushions and staples, I lightly sanded the frame just so my paint would adhere well to the surface.  I used inexpensive acrylic latex craft paint for the off white base color.  You know the kind of paint you buy at the craft store in the tiny bottle for about 99 cents (made by Plaid).  I used a simple drybrush technique and the paint worked great for this process.   
 
A drybrush technique is where you use a dry paint brush and dab just the tips of the brush into the paint (I put the paint on a paper plate for easy tip dipping).  Then you brush the item lightly all over and only dab more paint onto the brush each time the brush gets dry.  There is no need for full coverage paint when you are doing a drybrush antique look. The paint itself is not that impressive until a Dark Wax is used over it.  There are many brands of dark wax but I've only used this brand.  I used a cotton cloth to apply the dark wax (which also doubles as a finishing polish).  I used the same dry brush finish on the cane sides of the chair.  Followed by just a little wiping of dark wax over some of the cane. I wanted the cane to feel lighting than the wood areas. The final look is a nice vintage time worn feel. 

Here is a photo play by play of the makeover as it progressed.  Sorry I didn't take more pictures of the paint finishing as it was in process.


Although I completely removed the fabric from the rear cushion on the chair, I upholstered directly over the velvet cushion fabric on the seat.  I put clumps of batting into each of the old tufted holes.  Then I covered the top of the cushion with several layers of batting which completely hid any signs of the old tufting.  I used the same batting method on the rear cushion of the chair.

The burlap furniture strap in the back of the chair was used it to give strength to the back of the chair, so when a person leans into the chair the fabric can not rip.  I stapled it into place and used a few furniture tacks to hold it tight in place.  Notice I used a different fabric for the rear side of the chair.  I wanted to give it a totally custom look and feel.  


I am loving my final finished chair.  It was a bit more work than I had planned. However, completely worth it!  I love having one of a kind furniture pieces that have a history.   


Until next time...
Happy decorating!

Diana


New Thrifty Find - Barrel Cane Chair Makeover Begins

I recently found a new Goodwill (thrift store) not far from home.  It's a huge store, which I am loving because they get new items in daily. I've been there three times in the past week already.  I found this great barrel back chair with cane sides for only $30.  At first I debated on buying it, but after sitting in it for a few minutes, I knew I had to have it.  


Although when I first laid eyes on the chair I knew it had great makeover potential.  I wasn't sure if I could handle the tufting on my own so I was a little scared.  So what I did was this, while sitting in the chair at the Goodwill store, I browsed the internet for "painted cane chair photos".  Within a couple of minutes I was able to find several great inspiration pictures!!!  Those pictures of other peoples sucecssful DIY makeovers are what convinced me that I had to have this chair.  It had to come home with me.  Plus the fact that it was super comfortable, made it a winner.

The deconstruction process has begun and I'm super excited about what this chair will become.  Unfortunately I did put a small hole in my thumb with one of the staples as I was pulling it apart.  Oops, chalk that up to inexperience.  I guess it's a part of the learning curve!   Although it does hurt a little and has delayed my progress a bit, I am fine and soon this beauty will be a masterpiece.  


I went to my local fabric store and picked up two different fabrics. Since I wasn't sure which I wanted to use, I just purchased both. One is a cream color cotton duck fabric and the other is a striped greige (grey beige) with cream fabric.  Whichever I don't use on this chair, I can use on another project.  The plain fabric will definitely be much easier to work with, but I'm still considering using the stripe fabric and just not tufting it.  The finished project will be a surprise for both you and for me.  

I've decided to just let the chair talk to me as I make progress on it. No, I'm not crazy. I know that the furniture doesn't really talk to me. But if you like DIY projects, then you hopefully understand what I mean when I say it talks to me as I work on it.  Just like when it calls out to me in the store "please take me home"...  Doesn't this happen to everyone?

Until next time,
Happy decorating!

Diana

Thrift Store Find Turned One of a Kind Design

I am currently posting from my cell phone because I am having computer issues...  I wanted to share this beauty I just finished with you.  I found a retro/ghetto (lol) mid century modern piece at a thrift store for $25 and knew I could flip it into something fab... This chevron cutie is what I came up with.  I'm sorry I don't have better pictures. But I will post some as soon as I get my computer issue solved!

The before and after pictures are pretty dramatic on this piece.  The little three drawer before picture is seriously so ugly!!!  It looks like it came from the Brady Bunch house ;).  It is not a style that I would normally choose and I really don't like at all.  However, I knew I could somehow make something cute out of it.  Also, it was a sturdy well built piece that looked nearly new inside, so I thought I'd give it a shot.   My husband started sanding the top when I realized that I didn't have a before shot of this chest of drawers... So this is the first picture I remembered to take.


Notice the bevelled edge around the front and the ugly curve on the drawers and then those funky pull handles.  I knew I had to camouflage the front somehow because I really didn't like it!  


I am more than happy with the finished results...  What do you think?

Yard Sale Super Finds - Don't Be Afraid to Make a Low Offer


Last summer while visiting a neighborhood garage sale I saw an old buffet that I was very interested in.  Solid wood, dovetail drawers and a quality built piece.  They were selling it with a dining table and chairs and said they did not want to break up the set.  I told them that I lived just down the street and that I was interested in just the buffet.  He was asking a high price for the set and I figured he would never go for my "cheap" offer on just the buffet, but what the heck.  It never hurts to ask!  I got out a piece of scrap paper and wrote my name and cell phone number on it,  then I wrote buffet offer $50.  I told him if you aren't able to sell it, please consider my offer.  He basically laughed at me and said if he didn't sell it at the garage sale that he would post it online.  I figured I would never hear from him again.  

Six months later, I get a phone call.  "Hi, this is the guy from the garage sale down the street.  You offered $50 for the buffet we were selling."  I was shocked!  I couldn't believe this guy even kept the piece of scrap paper with my phone number on it.  He said "If you still want it, it's yours".  I told him "I can pick it up tonight at 7:00 if that works for you".  Up to this point I still hadn't found a buffet, so I was doing the happy dance!

I waited for my husband to get home from work, and we drove our little SUV down the street and brought our $50 beauty home.   I never ever expected to hear from the guy... especially after several months.  Apparently he tried to sell it via eBay and lost fees trying to sell it.  I didn't mention to him that eBay was not the best way to sell large furniture items.  If he had listed it on Craigslist (which would have been FREE), he likely wouldn't have had a problem selling it!

I was thrilled with my $50 find!  I knew as soon as I saw it that I wanted to paint it white.  I was so excited that I had my husband start sanding the rough spots out right away.  I forgot to take a before picture of the project (ooops)!  But here it is after the hardware had been removed and some light sanding had taken place on it.


Here it is after white paint and some light distressing to the edges.


I used the original hardware.  It was a bit retro and I didn't like the look of high gloss dirty brass so I painted it a dark brown.  The one thing I am still thinking of doing to it is using a dark wax on the distressed areas so they show up more. What do you think?  Should I add the dark wax to this piece? 


I can't wait to hear from you!

Blessings,
Diana


Linking up -
Miss Mustard Seed
Domestically Speaking

Before and After - Pottery Barn Wall Unit Makeover

I've had this Pottery Barn pine wall unit (armoire and bookshelves) since the 1990's.  I was completely tired of the pine, and pine is no longer in, so this baby has been begging for a makeover for awhile!  We finally got around to giving it new life.  Since it was already located in our master bedroom (which is upstairs), we painted it while it was still in our bedroom.  We just covered the floors (carpet) with tarps to protect it from paint splatters and spills.  We used brushes and rollers to paint it.  I love seeing the before and after.  It looks like a completely different piece of furniture.  Isn't it amazing what you can do with a little paint?!!


We started by putting all of the shelves and drawers on the floor and painting them with two coats each.


After the white was dry we painted a mocha color on the back panels of each piece to contrast the white.  Then I heavily distressed the edges of each piece using a scraper and sand paper.  I was going for a vintage chic n shabby chippy painted look.  I think we accomplished that.


Initially I was going to put the doors back on the center unit (to hide the television).  But the doors don't recess and so when they are open they hide the shelves.  Since we use the television in this cabinet often I decided to keep the doors off (for now).  However, I reserve the right to change my mind... which I tend to do often... Lol :) 


At this point the unit was done being painted but I still hadn't found hardware for the drawers.  I put some accessories (thrift finds and a finds from Home Goods) and a few books on the shelves and just played with them until I liked the way they looked.  I felt the shelves still needed a few more items, but I wasn't sure what yet.


Then I found the hardware.  I used glass knobs.  They give the look of antique glass hardware but they are actually new.  I love the touch of sparkle that the knobs provide!


So here is the makeover, completely finished.  I added a few more books to the shelves last night and I am very happy with the final outcome.  I hope you like it too!


Until next time,
Happy decorating!

Diana


This post has been shared at the following Linky Parties:


One Year Blogiversary & Revisit Very First Post

Today is day 365 since I first started blogging and first started Anyone Can Decorate.  Happy Anniversary or should I say Blogiversary to me and ACD tomorrow... Woohoo!  I can't believe how fast this year has gone...  It seems to have flown by!

I thought it would be fun to revisit my very first blog post from day one of Anyone Can Decorate.  Since I didn't have any followers when I first started, most of you probably have never seen it.  So here it is, I hope you enjoy it :)

Baby Nursery - Under $500 Complete

This entire baby girls room was decorated for less than $500.  The crib and mattress were purchased new. The Bellini dresser/changing table was found at a garage sale for $60, to which I added furniture appliques and re-finished in an antique white.  The rocking chair was found at a vintage shop for $25 (it used to be a neon yellow).  I added the furniture appliques to the rocker then painted and distressed it.  The bedding set and mobile were purchased new from eBay.  The canopy I made with a half round piece of plywood and L-brackets, with sheer fabric and trim simply attached around the edging of the board with a staple gun. The chandelier was designed by me and assembled by my hubby.  The table lamp, wall shelves, bulletin board, wall hooks, wood organizer box and wall cherubs were all old vintage pieces from flea markets and garages sales that I refurbished/painted for the room. It is amazing to see how much can be done on a a limited tight budget.  We started with a completely empty room and when we were finished it looked like we had spent thousands.


The chandelier above is dripping with teardrop crystals and petite pink roses.  I designed it from scratch using a combination of both vintage and new lamp parts.  It is painted with Rustoleum satain spray paint in Heirloom White. My amazing hubby wired this beauty and hung it for me.  We added the ceiling medallion to add to the sweet cottage chic look.  We used silicone dipped light bulbs for a soft glow. The floral pillow on the rocking chair is from Target, from Rachel Ashwell's Shabby Chic line.  We later added a soft sage green, cream and rose colored area rug to the floor in front of the crib.
  
The bulletin memo board was made from a vintage frame, painted with the same Heirloom White spray paint, and has distressed edging.  I used a pretty pink floral girly fabric and lace ribbon in a criss crossing pattern across the front. This was an easy DIY project.  I had my hubby cut a piece of fiber board the size of the inner frame..  I added a layer of batting, wrapped the fabric around it and used a staple gun to fasten everything to the rear of the board.


Sweet Dreams Baby Girl !!!


So there you have it.  My first post as written 365 days ago.  The blogging community has been so supportive and loving.  Thank you all very much!  I have enjoyed getting to know many of you and I look forward to seeing what this next year brings.

Blessings,
Diana

Table Makeover - Before & After

I've had this little round table for quite a few years.  It was the last piece of totally ugly golden oak furniture in our house.  It's from about the 80's when pretty much everything we owned was golden oak (yuck, what was I thinking?)... No offense if you like that look.. But it is so not me!!!  I decided it was definitely time to give this baby a much needed makeover!  I just wish I could give myself a makeover as easily :)  lol...

This is what the table looked like as I gave it a little light sanding to smooth out the damaged surface and to help the paint stick.


After a light sanding I wiped the dust off with a shop rag and then put up on my make shift work table to spray a coat of primer.  I like to use Rustoleum spray primer...  It works on pretty much everything, even plastic.


One coat of primer and it was looking pretty.  I even considered keeping it white at this point...


But since it was going into my stairwell, which is also white, I decided to go with the color Espresso which matches my stair rail.


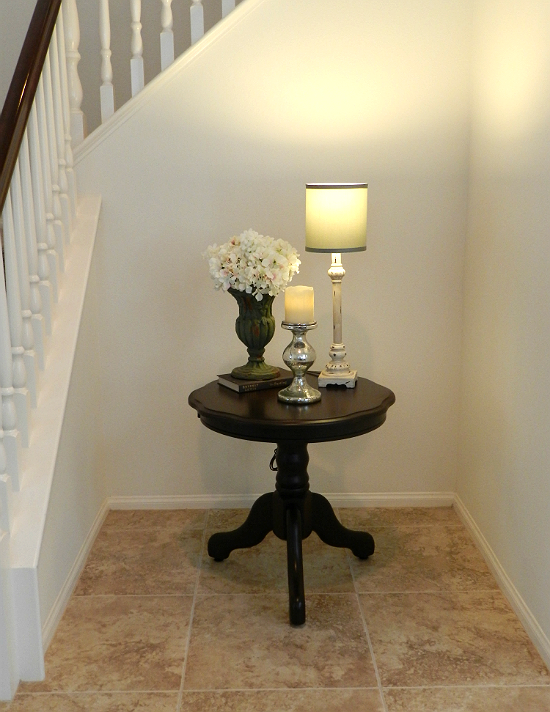
Here the cute little table is all finished in the base of our stairwell... Notice how the color of the table compliments the stair railing.  I know I still need to paint the walls and get a mirror or a couple of accessories on the wall, but I wanted to finish the table first before I started looking for what else to hang there.


Table makeover cost $8.  One can of primer and one can of paint.  The table is totally refreshed and like new again!  


I don't necessarily love all of the accessories as they currently are on the table (I need to find some better hydrangeas), but for now (until I find something better) they will do.  I found the adorable little shabby chic style lamp at Kirklands a few weekends ago.  It was only $15... I love me a good bargain!!!  


Until next time,
Happy decorating!