I love bunting flags. This is a simple tutorial that shows how I made this cute Valentine's decoration a couple of years ago. It's one of my favorite craft projects and wanted to share it with all of you.
 Have you ever wanted to make bunting flags? I think that they are completely adorable! However, being that I'm not much of a sewer (not at all), I had never given it a try. So I made this cute bunting flag banner for Valentines Day. It was a super EASY craft project that anyone can do! And the good thing is that there is zero sewing involved :)
I started by tearing out nine pages from the music book. I had decided to use an odd number of pages so I would have one hanging directly in the center. I planned to put a note on the center flag so I needed one in the center (I hope that made sense)...

After tearing out the pages, I cut a straight edge down the side that was torn. Then I cut and trimmed all of the excess edging around the music. I made one page as a template for size and then I cut the remaining pages to the same size.

Next I softly folded a few pages at once (without creasing), then I proceeded to cut the bottom off (as shown below)...

I did the same to all of the pages using my first cut piece as a template guide for the remainder of them.

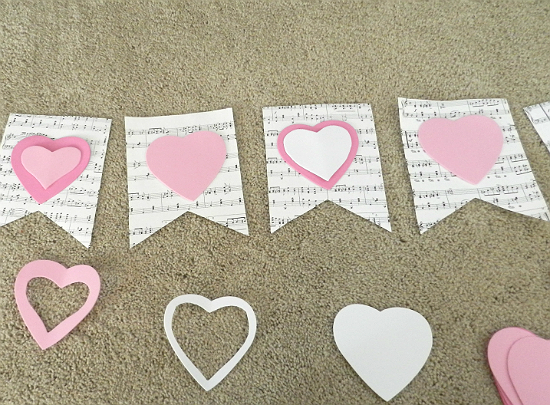
Next, I laid the pages across my floor and placed hearts across them, with dark pink and light pink alternating. I decided I wanted something a little more decorative than just the alternating colors, so I proceeded to cut out smaller hearts from additional white and light pink hearts. I folded the foam in half and cut my smaller hearts from the larger ones. After laying out my pattern, I decided I would lay out my text for the white center heart.
I decided to put the words "Be Mine" on the center heart using the glitter letters that came with the package of hearts.

Next I looked at my two different shades of pink ribbon before deciding to use the dark pink. I like the contrast between the darker pink and the white paper. At this point nothing was glued yet. Everything is just sitting in place so I could see if I liked the look... (which I did!).

I used clear packaging tape fasten the ribbon to the back of each page. (Note: music was printed on both sides of each page, which is why you see me taping to music). I left the ribbon slightly below the top of the page so the tape had paper to adhere to, both above and below the ribbon. I put about 1 1/2 inches of spacing between each of the flags.

After fastening all of the pages, I turned over the entire project so I was now looking at the front.

I used my multipurpose craft glue and smeared a bit on the back of each heart and then just eyeballed what looked like the center and fastened each one. It is a home made craft project so it doesn't have to be perfect... It is made with love and is supposed to look a little home made :)

So here is it, my finished project. I love how it turned out! This is a simple and fun DIY craft that anyone can do. You can even include the kids on it... Sometimes kids come up with amazing ideas! Have fun and be creative with it.


I would love to hear about your projects!
Until next time...
Happy decorating!
No comments:
Post a Comment
I love all of your comments and I read every one... I'd love to hear from you!
Blessings,
Diana