Pages

FREE Valentine's Printables - 1 Corinthians 13


These Valentine's printables are FREE for your personal use.  For full size versions, just click the download links located at the bottom of this post, save it to your computer (click and download when prompted), and then print it to whatever size you like. 

1 Corinthians 13, all about LOVE, is one of my favorite scriptures in the bible... so it was the first printable I made.  "Love is patient, love is kind, it does not envy, it does not boast, it is not proud, it is not rude, it is not self seeking, it is not easily angered, it keeps no records of wrongs.  Love does not delight in evil but rejoices with the truth, it always protects, always trusts, always hopes, always perseveres.  Love never fails."  That is pretty amazing Love!  Also, the BEST definition of love ever...


My printer program allows me to choose my frame size, I printed for a 5 x 7 frame and an 8 x 10 frame.  It was super easy to get the exact sizes I needed.

On this one I trimmed a little extra of the edging and added a red piece of scrapbook paper behind it to give it a small colored frame (sorta looks like it is matted). 

Below are a variety of different color options for this one. 


Valentine Printable #1 - Download Here  (LOVE)
Note: You must choose the SLOW DOWNLOAD button for the FREE Download


Valentine Printable #2 - Download Here  (red/pink)
Note: You must choose the SLOW DOWNLOAD button for the FREE Download


Valentine Printable #3 - Download Here  (purples)
Note: You must choose the SLOW DOWNLOAD button for the FREE Download


Valentine Printable #4 - Download Here  (aqua/redish pink)
Note: You must choose the SLOW DOWNLOAD button for the FREE Download


FREE Printables - Download below: 
Note: You must choose the Slow Download option for the FREE Download! It only takes a second...

Valentine Printable #1 - Here

Valentine Printable #2 - Here

Valentine Printable #3 - Here

Valentine Printable #4 - Here

Terms of use:  These printables are Free for my readers.  They are intended for personal use.  However, if you would like to make them available via your site, you may, but you MUST include a link back to this site (http://anyonecandecorate.blogspot.com).


Amazing Chocolate Melting Cake - Gluten Free


If you love Chocolate than this dessert is for you!!!  It is the easiest and most amazing cake I have ever made, (and I have made it many times). It my my husband and my absolute favorite favorite favorite dessert (did I say favorite?).. Yum!!!  You don't even need a beater or mixer on this one.  It is flour-less, which also means it's gluten free... and it is oh so so decadent, amazing, awesome, to die for (okay, so you get the point).
As I said, this recipe is easy!  It is quick, requires only six basic ingredients and it can be made in a short amount of time (less than 10 minutes from scratch to the oven)... and it takes only 30 minutes in the oven.  Yet people will think you are a gourmet chef with this totally easy peasy dessert :)

A few years ago on a cruise, one night with tried their Chocolate Melting Cake  with a scoop of vanilla ice cream.  I was in heaven, well as close as I could get to heaven on earth.  I loved it!  Needless to say I ordered it the next night too :)  Of course the cruise line was not going to give me their recipe, but I knew that it was a flourless cake.  Shortly after we got home I searched the internet for flourless cake recipes.  I stumbled upon a receipe that I tried and then tried again tweaking it slightly so it turned out amazingly meltey and oooooie gooey in the middle.  It is a huge hit with everyone I have ever served it to. I highly highly recommend it!!!

I like to try to make my recipes as organic as possible so I use organic butter, organic sugar and farm fresh organic eggs (however you can use white sugar and whatever butter and eggs you like).


Recipe -

Ingredients:

1/4 cup semi sweet chocolate chips
1/2 cup butter
3/4 cup sugar 
1/2 cup unsweetened cocoa powder
1 teaspoon vanilla extract
3 eggs

Directions:
  1. Preheat oven to 300 degrees F.
  2. In the top of a double boiler over simmering water (NOTE: I use two sauce pans, see below) Melt butter and chocolate chips.
  3. Remove from heat and stir in sugar, cocoa powder, eggs and vanilla.
  4. Pour even amounts into 4 oven safe dishes (fill about 1/2 full - dessert will rise)
  5. Bake in preheated oven for 30 minutes
  6. Let cool 15 to 20 minutes before serving
end recipe
--------------------------------------------------------------------------

I like to serve this dessert with a scoop of vanilla ice cream on top.  However, this chocolate dessert is also very good on it's own!


Step by step photos (with helpful tips) -

Make your own double boiler by using two sauce pans.  Place the small pan inside of the larger one as shown.  Put one or two inches of water in the lower pan. Turn burner on medium low.  The double boiler method keeps the butter and chocolate chips from burning. 

Melt butter and chocolate chips...

Remove from stove-top...

Pour in sugar, give a quick stir (will melt into hot butter mix)..

 Add cocoa powder and stir


Add eggs and vanilla then stir well (takes about one minute)... I  own a beater and a stand mixer... However, this stirs so quickly that I just use a wooden spoon to mix.


 The mixture will look like this...


Pour equal amounts into four dishes. Only fill dishes about half way because dessert will rise. I use CorningWare 7 oz. stoneware crocks  (ramekins) that I purchased at Walmart.  They can also be purchased through Amazon (Free shipping with $25 purchase) at this link: CorningWare French White 7-Ounce Ramekins


  I like the crocks (ramekins) because they are ready to serve, just add ice cream or whip cream to the top (depending on your preference)... With these, there is no greasing necessary, (Which I LOVE).  

Note:  If you prefer, you can use an 8 inch round cake pan, just be sure to grease and dust your pan with cocoa powder first.


Place crocks on a cookie sheet and put them into your 300 degree preheated oven for 30 minutes.  

Note:  If you prefer your cake be more traditional and not be gooey inside, just increase the oven temperature to 350 degrees and still bake for 30 minutes.

When you first remove them from the oven they will be puffy on top (sorta like muffins)...


As they cool they will collapse a bit, which makes them perfect for putting a scoop of ice cream on top! You can serve them about 20 minutes after they come out of the oven.  Warm, but not hot...  

Optional, after they cool, cover them with foil and serve them at your convenience.  I like serving them warm, so I heat them in the microwave for 20 seconds on high before serving. (Adjust micro time depending how powerful your  microwave is).  

This dessert is just as amazing on day two and day three as it is on day one.  However, I admit that, in our house they don't last past day two!!!  I swear I could eat them for breakfast, lunch and dinner... (hehe).


I like to serve with Breyers Smooth & Dreamy 1/2 fat Ice Cream because it is natural... and I feel a little less guilty :)  But, whatever ice cream you like is fine!


Yummy... this amazing Chocolate melting cake makes a great treat for Valentine's Day and for any day!


All you need is a spoon :)  Enjoy!!!

Before and After - Pottery Barn Wall Unit Makeover

I've had this Pottery Barn pine wall unit (armoire and bookshelves) since the 1990's.  I was completely tired of the pine, and pine is no longer in, so this baby has been begging for a makeover for awhile!  We finally got around to giving it new life.  Since it was already located in our master bedroom (which is upstairs), we painted it while it was still in our bedroom.  We just covered the floors (carpet) with tarps to protect it from paint splatters and spills.  We used brushes and rollers to paint it.  I love seeing the before and after.  It looks like a completely different piece of furniture.  Isn't it amazing what you can do with a little paint?!!


We started by putting all of the shelves and drawers on the floor and painting them with two coats each.


After the white was dry we painted a mocha color on the back panels of each piece to contrast the white.  Then I heavily distressed the edges of each piece using a scraper and sand paper.  I was going for a vintage chic n shabby chippy painted look.  I think we accomplished that.


Initially I was going to put the doors back on the center unit (to hide the television).  But the doors don't recess and so when they are open they hide the shelves.  Since we use the television in this cabinet often I decided to keep the doors off (for now).  However, I reserve the right to change my mind... which I tend to do often... Lol :) 


At this point the unit was done being painted but I still hadn't found hardware for the drawers.  I put some accessories (thrift finds and a finds from Home Goods) and a few books on the shelves and just played with them until I liked the way they looked.  I felt the shelves still needed a few more items, but I wasn't sure what yet.


Then I found the hardware.  I used glass knobs.  They give the look of antique glass hardware but they are actually new.  I love the touch of sparkle that the knobs provide!


So here is the makeover, completely finished.  I added a few more books to the shelves last night and I am very happy with the final outcome.  I hope you like it too!


Until next time,
Happy decorating!

Diana


This post has been shared at the following Linky Parties:


Simple Shelves - Huge Help Getting Organized

I love this simple storage solution!  


We moved into our home a bit over two years ago now.  I must admit that we are guilty of having many boxes that were never unpacked.  Our office closet had about 12 boxes full of junk that were just buried inside (behind the closed doors).  This past weekend my husband decided to go through all of the boxes (God bless him)!  After he was done, probably half of the stuff was trash (I have no idea why when we moved we brought some of this stuff/trash with us?).  About 1/4 of the stuff we donated and the last quarter of it was a bunch of office supplies that we had no place to store.  Since office supplies aren't pretty to look at inside the room and we had no sort of closed storage, I came up with the idea to put some kind of shelving into the closet.  We both started thinking about what we could buy or design or create for the closet.  My husband remembered that we had some wall tracks and brackets from an old closet organizer system at our last house.  They were just sitting in our garage unused.  We just needed to go buy shelving materials.  We headed to Home Depot and found some eight foot melamine boards (15" deep) with finished edges that we thought would work perfect in the closet.  We bought two of the boards, had them each cut into four foot lengths and brought them home to install.  

After we got home, my husband Jim got out his level, electric drill and some wall anchors... he found the studs, marked the wall and mounted the brackets all in about 20 minutes.  We added the brackets and placed the shelves on top of them.  It was that simple!  From start to finish, this project took less than 30 minutes to install.  The cost was only $35 for all of the shelving (since the brackets were just collecting dust in our garage, they were free).   I can't believe we didn't think of this sooner!


It is nothing fancy, but in the closet it doesn't need to be... I am loving the vertical storage!  Now I think I want to do the same kind of shelving in my craft room closet and maybe a wall in my master walk in closet.  The simple storage solution is an awesome way to organize much of the chaos!!!

Until next time,
Happy decorating... (or in this case, happy organizing)

Diana

Are You Thinking About Valentine's Day Yet?

I've been finishing up a few projects but they aren't quite ready to blog about yet.  In the meantime, I was looking around the blogosphere and was surprised to see how many people (DIY blogs) are already talking about Valentine's Day and sharing their Valentine's projects!

Myself, I just barely got Christmas down and I need a bit of a breather before I can start thinking about Valentines Day decorating or gift ideas.  Normally I wouldn't give it any thought until maybe early February.  But I found that as a blogger I need to be sort of like a department store...  Put the holiday stuff up/out early so everyone can start looking and getting ideas for the holiday far in advance.  The reason I know this is because I looked at my blog stats yesterday and I found that the #1 most requested search on my blog right now is "Valentines Day".   It seems crazy to think about it, but its true.

So for those that are already looking for Valentines decorating ideas I thought I would share a cute project that I did last year:


Here is a cute Valentine's bunting flag project that was super easy to make.... It is complete with the tutorial showing how I made it.  The entire project only took about an hour.  The best part of this project is that there is no sewing involved!  


Last year, I found this old vintage book of sheet music at an Antique/Collectible store in town for a few dollars. The book isn't an antique, but is older and was in excellent condition.   I found a box of foam hearts that included glitter lettering at Joann's Crafts.  I already had ribbon in my personal craft stock here at home.  The only other items I needed were ribbon, glue and scissors.


I started by tearing out nine pages from the music book.  I had decided to use an odd number of pages so I would have one hanging directly in the center.  I planned to put a note on the center flag so I needed one in the center (I hope that made sense)...


After tearing out the pages, I cut a straight edge down the side that was torn.  Then I cut and trimmed all of the excess edging around the music.  I made one page as a template for size and then I cut the remaining pages to the same size.


Next I softly folded a few pages at once (without creasing), then I proceeded to cut the bottom off (as shown below)...


I did the same to all of the pages using my first cut piece as a template guide for the remainder of them.


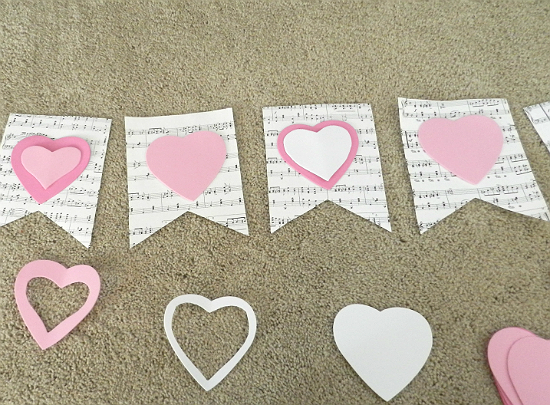
Next, I laid the pages across my floor and placed hearts across them, with dark pink and light pink alternating.  I decided I wanted something a little more decorative than just the alternating colors, so I proceeded to cut out smaller hearts from additional white and light pink hearts.  I folded the foam in half and cut my smaller hearts from the larger ones.  After laying out my pattern, I decided I would lay out my text for the white center heart.


I decided to put the words "Be Mine" on the center heart using the glitter letters that came with the package of hearts.


Next I looked at my two different shades of pink ribbon before deciding to use the dark pink.  I like the contrast between the darker pink and the white paper.  At this point nothing was glued yet.  Everything is just sitting in place so I could see if I liked the look... (which I did!).


I used clear packaging tape fasten the ribbon to the back of each page.  (Note: music was printed on both sides of each page, which is why you see me taping to music).  I left the ribbon slightly below the top of the page so the tape had  paper to adhere to, both above and below the ribbon.  I put about 1 1/2 inches of spacing between each of the flags. 


After fastening all of the pages, I turned over the entire project so I was now looking at the front.


I used my multipurpose craft glue and smeared a bit on the back of each heart and then just eyeballed what looked like the center and fastened each one.  It is a home made craft project so it doesn't have to be perfect...  It is made with love and is supposed to look a little home made :)


So here is it, my finished project.  I love how it turned out!  This is a simple and fun DIY craft that anyone can do.  You can even include the kids on it...  Let them have fun and be creative with it.  Sometimes kids come up with amazing ideas!


Until next time,
Happy decorating!

Diana

New Years Resolutions or Practical Goals?


Our New Years resolutions are usually some big task that we plan to take on.  Like "tame the bulge" (i.e. Lose 50 pounds); Get in Shape/Exercise, Quit a Bad Habit (like drinking or smoking); Get out of Debt; Get Organized.  These are all great ideas as resolutions.  But most people start off their new year with the best of intentions and then they often lose their momentum by about the end of January.  It's sad, but it's true.

Last year my resolution was to get completely organized.  Hah... I admit I failed that one!  Oh, I did manage to organize a few areas around the house, but am I completely organized???  Not even close!

This year I decided I wasn't going to make some grand resolution, but rather set myself some realistic goals for this new year.  I first must confess that I have this horrible habit of starting projects, making good progress, but then not finishing them.  I often get to about 75% completion and then I get completely sidetracked and I go start on something else.  I am not sure why I do this.  And I do it somewhat regularly.  Right now I have at least five house projects that are "in process".  Sometimes, I am waiting for the funds to finish off the project, but other times I just get lazy toward the end and I move on to something more exciting.  Sheesh, I probably need a counselor to tell me why I am this way.  Are there others out there that are guilty of this too?  Please tell me there are!

My goal this year is to tackle all of my unfinished projects around the house, one at a time, and get them 100% completed.  (Preferably before I start any new ones! hehe) I am making a list of all that I need to do on each project and then I can cross off each step as it is achieved.  This way I will be able to see the actual progress as it takes place.  This is huge for me, because I am not a fan of lists!  But I am doing one because I think it will help.

In the future when I start a large scale project (like remodeling and decorating an entire room) I think I will section the project out into several smaller achievable tasks, rather than taking on the entire room renovation all as one project.  I think this will work better for me.  At least, I sure hope so!  Wish me luck :)

Did you make a New Years Resolution or set any goals for yourself this year?  I'd love to hear them!

Blessings,

Diana

Top 12 DIY Projects from 2012

As we begin 2013, I thought I would first take a look back at 2012 and see what the most popular projects and posts were on the blog.  A few of them I had expected, but I was completely shocked by the top post of the year!


If you missed any of these this past year, you can just click on their link to read the full post and see all of the pictures.

The most popular projects/posts from 2012 on Anyone Can Decorate were as follows:

Coming in at number 12.....

12 - My $10 Kitchen Backsplash - Chalkboard


11 - Organized Craft Space - Greeting Card Organizer


10 - $5 DIY Memo Board - Thrifty Crafty Chic


9 - Chandeliers I've Made


8 - Homemade DIY Paint Booth


7 - DIY Mason Jar Snow Globes - Anthropologie Inspired


6 - DIY Chalkboard - Total Cost Only $10


5 - Pumpkin Painting - Fall Decorating Ideas


4 - DIY Burlap Christmas Tree Garland Wrap


3 - A GLAMPING We Will Go - Glamorous Camping

Our DIY Glamping trip was my favorite project of the year.  A lot of time went into the planning of the trip, and designing all of the stuff that would decorate the campsite. But, it came off beautifully and it was a wonderful romantic weekend for my hubby and I.  I think we will be doing this again next summer!


2 - How to Antique Glaze - DIY Tutorial


And the top post of 2012 is...

1 - Hot Tip - .25 Cents to Clean Stubborn Toilet Bowl Ring

I was shocked that this was the most popular post of the year.  It wasn't really a project, it was just a tip that I discovered that worked well on my nasty hard water toilet bowl ring.  This post has by far received the most views of everything I did this year.  Who would have thought that sharing a random cleaning tip would be so hugely popular.  It just goes to show, you never know what people want to hear about... lol.


I wish you all a very Happy New Year!  I look forward to sharing more creative crafts, projects and ideas with you this year!

Blessings,
Diana