Fun Freebies

I came across a site that has lots of fun freebies... Including super cute printable Valentine's cards and many framable printables (I know those last two aren't real words, but you know what I mean). Check out the site for some fun stuff!


Sprik Space: Freebies:  (Because the best part of the internet is what you can find for FREE, right??)


See Freebies HERE

I can't believe tomorrow starts the month of February... Time is flying by so fast! Now I get to start planning what to do for my hubby this Valentine's Day.

Until next time,


DIY Valentine Decorating - Bunting Flag Banner

Have you ever wanted to make bunting flags?  I have... I think that they are completely adorable!  However, being that I'm not much of a sewer (not at all), I've never given it a try.  So today I made this cute bunting flag inspired Valentine's Day banner.  It was a super EASY craft project that anyone can do!  And the good thing is that there is no sewing involved :)


The idea for this project started last weekend when I found this old vintage book of sheet music at an Antique/Collectible store in town for a few dollars.  The book isn't an antique, but is older and was in excellent condition.  Yesterday I went to Joann's Craft Superstore and found a box of foam hearts that included glitter lettering (the foam cut hearts were on sale of course, I always love me a good sale!).  I already had ribbon in my personal craft stock here at home.  The only other items I needed besides what is in this next picture was clear tape and glue.


I started by tearing out nine pages from the music book.  I had decided to use an odd number of pages so I would have one hanging directly in the center.  I planned to put a note on the center flag so I needed one in the center (I hope that made sense)...


After tearing out the pages, I cut a straight edge down the side that was torn.  Then I cut and trimmed all of the excess edging around the music.  I made one page as a template for size and then I cut the remaining pages to the same size.


Next I softly folded a few pages at once (without creasing), then I proceeded to cut the bottom off (as shown below)...


I did the same to all of the pages using my first cut piece as a template guide for the remainder of them.


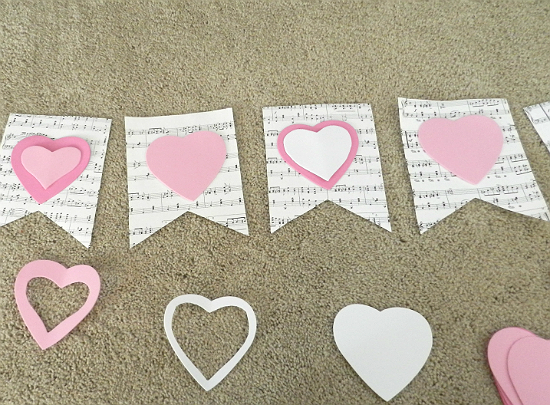
Next, I laid the pages across my floor and placed hearts across them, with dark pink and light pink alternating.  I decided I wanted something a little more decorative than just the alternating colors, so I proceeded to cut out smaller hearts from additional white and light pink hearts.  I folded the foam in half and cut my smaller hearts from the larger ones.  After laying out my pattern, I decided I would lay out my text for the white center heart.


I decided to put the words "Be Mine" on the center heart using the glitter letters that came with the package of hearts.


Next I looked at my two different shades of pink ribbon before deciding to use the dark pink.  I like the contrast between the darker pink and the white paper.  At this point nothing was glued yet.  Everything is just sitting in place so I could see if I liked the look... (which I did!).


I used clear packaging tape fasten the ribbon to the back of each page.  (Note: music was printed on both sides of each page, which is why you see me taping to music).  I left the ribbon slightly below the top of the page so the tape had  paper to adhere to, both above and below the ribbon.  I put about 1 1/2 inches of spacing between each of the flags.


After fastening all of the pages, I turned over the entire project so I was now looking at the front.


I used my multipurpose craft glue and smeared a bit on the back of each heart and then just eyeballed what looked like the center and fastened each one.  It is a home made craft project so it doesn't have to be perfect...  It is made with love and is supposed to look a little home made :)


So here is it, my finished project.  I love how it turned out!  This is a simple and fun DIY craft that anyone can do.  You can even include the kids on it...  Let them have fun and be creative with it.  Sometimes kids come up with amazing ideas!


For many other great decorating ideas visit:  Between Naps On The Porch where I linked this DIY project.  It is one of my favorite decorating idea sites!  Other link parties I'm attending are:

Bubbly Nature
Days of Chalk and ChocolateTip Junkie handmade projects


Until next time...
Happy decorating!

FREE Valentine's Day Printable Art


I recently made a couple of Valentine's art printables and I thought I'd share them with all of you.

These are available to you FREE for your personal use.  For full size versions, just click the download links at the bottom of this post, save it to your computer (click and download when prompted), and then print it to whatever size you like.

1 Corinthians 13, all about LOVE, is one of my favorite scriptures in the bible... so it was the first printable I made.  "Love is patient, love is kind, it does not envy, it does not boast, it is not proud, it is not rude, it is not self seeking, it is not easily angered, it keeps no records of wrongs.  Love does not delight in evil but rejoices with the truth, it always protects, always trusts, always hopes, always perseveres.  Love never fails."  That is pretty amazing Love!  Also, the BEST definition of love ever...

My printer program allows me to choose my frame size, I printed for a 5 x 7 frame and an 8 x 10 frame.  It was super easy to get the exact sizes I needed.

On this one I trimmed a little extra of the edging and added a red piece of scrapbook paper behind it to give it a small colored frame (sorta looks like it is matted).

Below are a few different color options for this one. If you have another color option that you would like, feel free to let me know via the comments below and I will add it for you.


Printable #1  (LOVE)


Printable #2  (red/pink)


Printable #3  (purples)


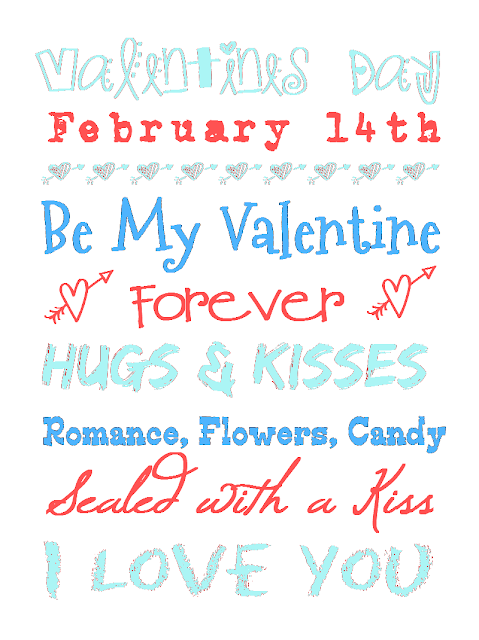
 Printable #4  (aqua/redish pink)

FREE Printables - Download below: 

Valentine Printable #1 - Here

Valentine Printable #2 - Here

Valentine Printable #3 - Here

Valentine Printable #4 - Here

Terms of use:  These printables are free for my readers.  They are intended for personal use.  However, if you would like to make them available via your site, you may, but you MUST include a link back to this site (http://anyonecandecorate.blogspot.com).

Post shared at:

Bubbly Nature


Blessings,

Best Valentine's DIY Decor Projects

OMG... These are so friggen cute I can hardly stand it :)  While I was looking for Valentine's decor DIY project ideas I came across a few that I absolutely must share!

I LOVE, love, love... these "Love Note Pillows" from Days of Chalk and Chocolate.  Her website has a fab tutorial on how she made them.  I so want to reach into my computer and steal these (and that beautiful chair!). LOVE!


Another great DIY is this awesome Valentine's subway art from Tatertots and Jello, who also has a great tutorial on her site for this one. This sign motivated me to order some vinyl stickers for my Cricut craft cutter so I can make my own fun subway art.. (Yeah... another fun project on my list of DIY's to try, that list is getting long).  I just wish I had the time to do every fun project that inspires me.  As it is, I can hardly find time to do the dishes and laundry... lol.


This is a super cute Love window from House of Smiths placed above a nice decorative Valentine's vignette.


Super cute Valentine framed art from The Idea Room.  The site has a tutorial on How to Make this beauty along with many other inspirational ideas.


This felt heart wreath is also from The Idea Room.  Visit the site for her step by step tutorial.  How precious and adorable is that face... I'm lovin the heart wreath too :)


All of these projects totally inspire me to get crafting...

I'm currently working on a few Valentine's printables which will be available FREE to you in a couple of days.  I'm painting an old frame today to display them in.  Visit again soon to check them out :)

Blessings,

Organizing the Kitchen

Yeah... I'm getting organized!  Lately I've been super frustrated with my Tupperware and plastic containers cupboard.  It was just a couple of shelves crammed full of miscellaneous lids and containers... and every time I unload the dishwasher it seems that whatever I put into the cupboard just manages to shove the other pieces to the very back.  So this weekend I decided it was time to do something about it.  I researched what kind of pull out system I could put inside the cabinet and I needed it to be super reasonably priced!  I researched online to see what I could find... I found a couple of brands that appealed to me.  Rev-A-Shelf  and ClosetMaid.  I ended up going with the Closetmaid because it was an inexpensive solution to my problem.  Since I eventually want to do all four openings on my island cupboards, going with the higher priced options just wasn't for me.  Since plasticware isn't heavy, these ClosetMaid wire basket pull outs were the perfect choice.  I will be able to do all four pull outs for under $100 (yea... I'm stoked about that).  We started with doing just one pull out on the top shelf of the cabinet... I wanted to be sure it worked well before investing in several of them.  It does and I love it... so I will definitely be picking up a few more!


I like how this storage solution turned out so much that I plan to go buy another one now and do the other side of the cabinet (for the rest of my plastic containers).  I love that I can now just slide it out (like a drawer) and I can actually find my lids!  Before the lids were always disappearing into the rear of the cabinet and I'd have to get on my hands and knees and dig around the back of the cabinet to find them.  I'm definitely getting a bit too old to be crawling around on the kitchen floor... so this little fix is HUGE for me!!!  I'm digging it :)  and it was super easy to install too!


While I was looking at other options for organization, I found several other items that I am interested in eventually adding to my kitchen and pantry.  This can organizer looks like it would free up a ton of room on the shelves.  It's called the Cansolidator 40-Can Pantry Shelf Organizer (clever name!).  It is the can system shown below.  This is great for putting in a cupboard.  No more not seeing what is in the back of the cupboard (yipee)...  Also, I love that you put the food into the top slot and it comes out the bottom.  So it self rotates your food.  As long as you always use cans from the bottom, you are using the oldest dated can first.  Here are some great inspiration pictures of this system.

These make such great use of cupboard space (or lack of cupboard space, depending on the situation)...  and nothing gets buried in the back of the cabinet.  I so could have used these back in my small condo!


You can even use them in the refrigerator for sodas or beer.


 It's pretty cool that you can stack them and they connect side by side.  Also they can widths are adjustable (notice even the thin tuna can slot on the bottom).  I want these for my pantry!


Below are links via Amazon to the great organizational items that I mentioned above...  They can be purchased at hardware stores, but Amazon is super convenient.


I am totally enjoying getting organized... and  I can't wait to do more!

Until next time,


Inspired by the Beach


I often find design inspirations at the beach.  I love the blue and aqua colors from the ocean and sky.  There are many great natural found elements at the shore, such as sea shells, driftwood, sand and sea glass.  I see a beautiful color palette and tons of decor inspiration in all the surroundings.  Beach inspired decorating provides a very relaxed atmosphere with calm and soothing surroundings.  I like using vintage weathered wood furnishings and painted furniture mixed with soft light colored fabrics and pops of color in the accessories.  Living in a beach inspired home, everyday feels like your on vacation, (especially if someone else comes and cleans it... lol.  We could all use that!)...

Source: BHG.com


Source: BHG.com


Source: In My House


Source: BHG.com

I love the rustic distressed vintage wood doors used as the headboard.

Source: Archithings.net

Keep in mind that decorating with found things is easy to do and it is so beautiful!  Plus it's major budget friendly!  However, don't just steal your neighbors flowers (you probably want to ask first).  I love the pop of color that is created with these hydrangeas.  Also the simple starfish on the table adds a subtle beachy touch. (I know beachy isn't a real word.... but I like it!)

Source: A Beach Cottage


Source: Topic Den


Source: Beach Finds

This last picture is the ultimate display of found items...  A large collection of starfish and seashells covers this bathrooms walls.  The shelves are shallow ledges that surround the entire room.  Although it does make the walls a little bit busy, it is definitely an interesting way to display the collection... and there is still plenty of room for many more items as they are found while strolling along the beach.
  
Source: Unknown

Whatever you do when decorating your home, always surround yourself with items that you love!   That way you will always feel wonderful in your space.  The items don't have to be expensive!  Keep your eyes open, you can find many decorative elements in nature and the best part is, they are free... 

Happy decorating!