Pages

Adorable Interactive Christmas Table for the Kids


Yesterday I decided I wanted to do something fun for the kids at their Christmas Table. I had some vinyl chalkboard contact paper and a large thin piece of fiberboard (smooth finish). I first covered the kids table with brown butcher wrapping paper, Then I covered the thin fiber board with the self adhesive chalkboard paper. I put a cute few snowflake ornaments and a little sled in the center with a container of chalk on top. I added a few snowman napkins for drawing inspiration... and there you have it. A fun interactive place for the kiddos or the adults to get creative if they want. Even if nobody decides to draw on it, I love how it turned out!!!

I hope you all have a wonderful and blessed Christmas!

Until next time,

Diana

Post Card Christmas Tree Craft

We are currently living back and forth between two different homes. I have done some Christmas decorating at each place.. but with so much traveling and packing to go back and forth I've been horrible at photographing and sharing this years decorations. 

Today I am re-sharing one of my vintage posts of these DIY Christmas Trees made from Antique Postcards... I put these up each year since I've made them.


My mother used to collect vintage and antique postcards.  She gave me a box full of them about five years ago.  Most of the dates on them are from the early 1900's.  I always figured I would use them on some craft project eventually, I just didn't know what or when.  This week I decided to finally craft with them.  I came up with the idea for these adorable antique postcard Christmas trees.  After a little trial and error, I figured out how to make them and they were actually quite simple to do!  The best part is that they didn't cost me a cent...  I used items I already had around the house :)

I started by creating cones with some scrap-booking paper and packaging tape. I used two pieces of 12" x 12" paper and put them into a cone shape and then taped the edges.  I wanted the cones to be taller than a single piece of paper would make, so I shaped the first piece and taped it, and then put the second piece inside and shaped it to the first giving it extra height.  Then I added a cut piece to the open area that remained.  I cut the bottom level and then I made a second cone that was slightly shorter.

  
My cones aren't very pretty, in fact not at all, but they are just for the base so it didn't much matter what they looked like.  I ended up taping the entire exterior of each cone to give them extra strength.


I cut each of the old postcards into strips and then curled them around a pen to give them a curved look.  As I cut the cards I tried to keep stamps and postal markings in tact so they could be read when looking at the trees.


After they were curled I started from the bottom up, one row at a time...  I used packaging tape to tape each piece to the cone. 

Below is the first tree as I finished it.  Notice how you can see the stamps and postal marks.  There are dates from as early as 1905 to about 1915 on this tree.  All of the stamps were one cent back then.  


The second tree I decided to give a different look.  I folded each of the cut strips in half and stapled them.  This gave them some thickness.  Again I made sure to show the stamps and postal markings.  Row by row I attached them with the packaging tape.  I used packaging tape because it is much stronger and stickier than Scotch tape!  This second tree was the easiest to make.  It didn't need near as many rows to I made it in about 15 minutes.


In the next picture you can read some of the writing on the cards, and see the stamps up close and postal dates.  


The stars on top I cut out of postcards too.  I cut two sides for each and I glued them to the top of each tree.


I love how they both turned out.  I am not sure where I am going to display them in the house yet.  I'm thinking maybe the coffee table is best.  There is so much history on the 100 year old post cards that they make for a great conversation piece!


Until next time,
Happy Decorating!

Diana

Holiday Photo Wall - The Perfect Collage


How gorgeous is this Winter inspired Holiday photo wall. I love the contrast of the dark grey chalkboard like wall with the black and white photos and the pops of red! I wish I could take credit for it, but I found this beauty during a visit to Pottery Barn. It's so inspiring that I couldn't help but snap a few photos to share.


Happy holidays and happy decorating!

Blessings,

Diana


Come visit "The Vintage Marketplace" Starts Friday Dec. 5th

The Vintage Marketplace at the Oaks in Rainbow (Fallbrook, California) is being held this coming weekend... It will be from Friday, December 5th though Sunday, December 7th. See the flyer below for the address and full details.

There will be 60+ vendors selling vintage home and garden finds, re-purposed items, jewelry, art, clothing and more... I'm looking forward to seeing lots of pretties and getting some Christmas shopping done. Hope to see you there!


Happy Thanksgiving


I hope you all had a wonderful and blessed Thanksgiving!

Our Thanksgiving table centerpiece was inspired by some stunning Fall leaves that my daughter found this morning as she and my husband were on a hike. 

Found items from nature make for perfect inspiration!

Blessings,

Diana


Cranberry Pear Recipe - Great for Holiday Entertaining

Our family has always loved cranberry sauce on Thanksgiving. We used to just open a can, slice it and that was it. However, one year my mom made cranberry pears and we all loved it so much that now it makes a regular appearance each Thanksgiving!

There are two ways to make cranberry pears and I will share both of them with you. One version takes about 5 minutes of preparation (this is the way I used to make them) and the other (healthier version) takes 15 or 20 minutes to prep (depending on how fast you can peel pears).  Either way, most of the work is done by a slow cooker (Crock-Pot).


Last year I started eating Paleo which in short meant no more processed or refined food of any kind.  So for us I make a healthy, free of refined sugars (but still sweet) version of cranberry pears. 

Note: canned cranberry sauces main ingredient (depending on brand) is sugar or high fructose corn syrup.  So, using canned berries is not an option for our family... Fresh cranberries is what I choose to use.

The recipe I make is simple using only three ingredients:  Fresh cranberries, 100% pure maple syrup (from a tree, I like Grade B), and pears (I used fresh organic).  

Directions: (Healthy version)

Turn the crock pot on Low then add the following:

12 ounces of fresh cranberries
1/2 cup of pure maple syrup
4 ripe pears (peeled, cored and cut into slices)

Stir and let simmer on low for three to four hours (sample taste at about two hours to see if more sweetener. Keep in mind that fresh cranberries can be quite tart depending on their ripeness, so you can add extra maple syrup if needed.  

As the cranberries cook they will soften and split open spreading their flavor throughout the pears. Depending on how many people you are feeding you can adjust the recipe size. We like to serve them warm but they can also be made in advance and served chilled. They taste excellent either way. You can substitute the maple syrup with agave, honey and/or a combination of the three. Whichever sweetener you prefer will work.  


Now for the super simple five minute version (3 minutes if you are fast with a can opener)...  

Directions:  (quick and easy)

Turn crock pot on low:

Open a can or two of pear halves (or slices), quickly drain them and pour them into crock pot,

Open a can of whole berry cranberry and pour/spoon it into crock pot...

Simmer on low for three hours.  

Yep, that's it.  Serve warm or chilled.  


It doesn't get any easier than that folks!  We made it the simple way for years... The pears absorb the cranberry flavor and taste amazing :)

Whichever way you choose, cranberry pears will be a hit with your family!

Blessings to you and yours,

Diana


More Crock Pot Thanksgiving Ideas


Holiday Entertaining Made Simple - Crock Pot Thanksgiving

Last Thanksgiving I decided I wanted to make the our Thanksgiving dinner simple. I wanted to actually enjoy the holiday visiting with our family and friends rather than working in the kitchen the entire time.   

I got this awesome Crock-Pot Hook Up System. I absolutely love this thing! Each unit can be purchased separately and you can plug in as many as six units into just one outlet. The units push together side by side and connect each other. They come in different sizes, different colors and with different temperatures they make for super easy entertaining!   


I got the double one quart unit (shown on the left),  2 of the two quart units (center) and one three quart unit (on the right). I use them often. You only have to turn on the units that you want to use (as each one has it's own on/off knob and adjustable heat settings). You can cook your entire meal right in these crocks and then turn them to the warm setting until you are ready to serve.  Each unit came with it's own serving spoon and a spoon slot in the crock (so your lids sit on them tightly) while the spoon is in them.  

I originally had one huge crock pot,that I found too heavy so I rarely used it because I didn't like cleaning the heavy beast. These unit being smaller are much lighter and easier to clean. Another great feature is that the units stack for easy storage. I'm surprised how many meals I've been able to make in them. Since buying these I've turned into a crock pot chef.

Last year I made a completely Paleo Thanksgiving in these Crocks.


I have made both seasoned turkey breasts and a full size chicken in the large crock. I'd never even tried sweet potatoes prior to getting these Crock-Pots and now I make sweet potato mash often!  I also made Cranberry Pears in a crock (Recipe Here)

For a healthy dessert I cut apple slices with my Apple Corer Peeler Slicer (that also Peels potatoes) and put them into a crock pot with cinnamon, honey and chopped pecans.  
After a few hours the apples were tender, flavorful and oh so yummy!  I've had my apple slicer for about 14 years and still use it all the time.  They have made improvements on it (like adding a suction cup), but it is still the same amazing tool.  It works great for peeling potatoes and for when I  make homemade apple pie.  

This year Thanksgiving will be a little more traditional. Everyone wants real mash potatoes and stuffing, but again I will be making several items for our dinner in this great Hook up System.  

These little units are also great at Holiday parties for keeping h'orderves and appetizers warm. They'd make a great Christmas gift.

Time for some entertaining.

Blessings,

Diana

Simple DIY Candy Sweets and Treats for Halloween and Fall

Here is a fun easy treat to make without having to turn on the oven... I love using candy melts for dipping treats, it is so simple anyone can do it!


To make these we went to our local craft store and bought different color candy melts, sugar eyeballs, candy sprinkles, cellophane treat bags, food coloring markers and lollipop sticks.  From the grocery store we got pretzels, Rice Krispies cereal, marshmallows and butter.

We used just a few items for dipping.. Pretzels, marshmallows and Rice Krispy treats (that we made, per box directions). However you can dip almost anything you like.


If you haven't used candy melts before, they are super easy to use. They come with simple melting and thinning instructions on the back of the package. I put the melts in oven safe dishes, then use the microwave method to melt them. 

I go an extra step and I sit them in an electric skillet (on simmer), with 1" of water at the bottom of the skillet (to keep them melted no matter how long we are working with them. The water in the bottom keeps them from potentially burning at the bottom of the cups).


Making the rice krispy treats was so simple.  It only took about 5 minutes.  We decided this is by far the fastest and easiest treat ever to make!  With only three ingredients, Rice Krispies, butter and marshmallows, it was a cinch!


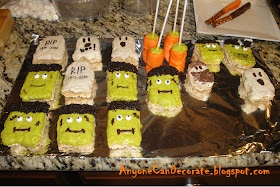
We used an edible food coloring marker to draw on our cute little Frankensteins and ghosts.


We dipped marshmallows to look like candy corn.  We first dipped the entire marshmallow in white.  Then put it in the refrigerator to harden the coating quickly, then came back and dipped the orange (harden), then the yellow at the bottom.


We put the candies onto wax paper while they hardened.  The wax paper removes easily from them.


We cut the rice krispy treats into triangles and then shaped them into the different things we wanted to make.  They are soft and pliable so it was easy to do.


Candied pretzels are super easy!  You just dip them in the cup of melted candy or chocolate or use a spoon to drizzle the candy onto them.  


Sprinkles are applied while the candy coating is wet (it holds them on like glue).  


This little Frankenstein is my favorite of all the treats we made.  My daughter actually made him and I think he is so cute!


After we were done making all of our candy treats and they had hardened, we put them into cellophane treat bags and tied a ribbon around each. We had gotten a cake box to put them all in for my daughter to take them to work.


I hope these super easy sweets and treats inspire you to make a few treats of your own.

Until next time...
Blessings,

Diana
  

10 Days Without Internet... How Does One Survive?

Hi all... For over 10 days I have not had internet or a computer... Yikes. I did have my cell phone but the area where we were only had occasional 3G reception (with one bar)... which when trying to use a smart phone was kinda like using dial up and then having it repeatedly FAIL... Uhg. How did we ever use slow dial up and wait 3 or 4 minutes for one page to load?  

I found myself starting to go stir crazy. We don't realize how attached we are to our computers and social media until we don't have it for awhile. Then when you take away the use of our phone, I personally felt a bit lost. I guess that is a sad statement, but it's true.


As of today we are back among the living :) We finally have actual internet access... It's hard to think back to when we lived without it!  

I hope you are doing well!

Blessings,
Diana

Update - What's Been Going On

It has been over 100 degrees here for the past week plus. I can't even begin to think Fall decorating yet... It is still fully Summer here!

The last two weeks have been crazy busy.. Along with the crazy California heatwave my dad had to have a triple bypass (open heart surgery). Two weeks ago he went in for an Angiogram to see how things looked and they found a few major blockages. He was admitted immediately (Friday) and then doctors operated on him first thing Monday morning. I am happy to say surgery was a complete success and he is home now and healing very well. It's amazing that they have the ability to do such a major surgery and send you home just a few days later!

With family things in the forefront decorating has been on the back-burner, Eventually I will get some decorating done here and I will be sharing it with you as soon as I do. I hope you all are doing well.

Blessings,
Diana

Wow... School Has Started Time to Start Thinking FALL

The weather is still in the mid 90's where I live in Southern California and it's hard to believe that FALL is just around the corner. 


As I was browsing through a few of my favorite stores this past weekend, seeing Fall decor everywhere, I realized that this past year seems to have completely flown by!!! 

So as I'm finishing up a few projects around the house I'm also starting to think about what I will do to decorate for this Fall season.

Here are a few links to prior Fall posts of mine:


Finally A New Computer - Why I love my HP Envy

I'm sorry I was away for a bit. After my computer took a dump I was told it would take two to three weeks for repair. I finally bit the bullet and decided to purchase a new laptop. Sadly, my old one was just about 15 months old and of course it was out of warranty (Ugh!). 
 
Once I decided to get a new computer, then came the debate of whether to buy an Apple MacBook or a Windows based laptop. I do have an iPhone and an iPad, but when it comes to my actual computer Windows is all I've ever known. Macs are so cool and I've always wanted one... but they are also much more expensive and I have no idea how to actually operate one (hehe). So in the end, I ended up with another Windows based computer. I haven't had an HP laptop in over 10 years, but I fell in love with the HP Envy! It has a 360 degree flexible screen hinge which allows me either use it like a traditional laptop or fold it completely flat (like a huge tablet)... It still has a full size keyboard and it is also a touchscreen which makes it super convenient!!!
 
 
This photo shows my new laptop in all of the different positions it can be used in. I am loving it so far and am so glad I made the decision to go with the HP Envy! Now I can get back to blogging and soon I will share the projects that I've been up to around here.
 
Until next time,
Blessings!
 
Diana
 

DIY Blogger Challenges - My Laptop Died

When it comes to computers I basically have two.  A 15 month old a Windows based laptop and an iPad mini.  My 15 month old ASUS laptop has decided to completely die on me! It has no power (zero). When I plug it in it won't charge at all. Of course this is the first time that I didn't buy the extended warranty (go figure)... Why is it that when you buy the extra warranty you never need it, but when you don't have the extended warranty things break??? And they usually break shortly after the manufacturers warranty expires. Ugh!!!

I've always figured that if I ever had a problem with my laptop I could just blog from my iPad. So here I am typing very very slowly from my mini... The sad thing is I've discovered that I'm clueless at how to attach any pictures via my iPad! I didn't think I was technologically challenged, but apparently I am ;)

So although I have three projects to share with you, it may be several days before you will see any actual pictures.  I'm not sure if it's worth paying to have the laptop repaired or if I will just have to get another. Tomorrow I will visit Geek Squad and see what my options are.

In the meantime,
Happy Decorating and God Bless!

Diana


Summertime Drinks in Mason Jars


I absolutely love using Mason Jars in the summertime for serving cold drinks! Simply adding a cute Paper Straw and some fruit makes them so inviting.

I Have Decorating ADD - "Decorating Attention Deficit Disorder"

I recently realized that I have "Decorating ADD" (Decorating Attention Deficit Disorder). I have several projects in progress all at one time. They are each at the 75% to 85% completion stage. I haven't shared many of them since they aren't completely done. 

I'm wondering as DIY blog followers do you prefer to see projects little by little as they progress (seeing both the successes and the occasional pitfalls/failures)? Or would you rather see posts that only show the project through to their Grand Reveal?


Some projects take a long time while waiting to find the last few decorative pieces to complete the space. During this time I tend to move on to a new project (or two or three). Other times I'll be visiting a thrift store, yard sale or flea market and I'll find an amazing piece that inspires an entirely new project. When this happens I'm guilty of leaving a prior (not quite finished) project in the dust. I find that having a creative brain it needs be creating at all times. The creating process never really stops. 

There have been times that I've thought I'd love to live in a model perfect home that wasn't like a constant canvas or art piece that is being created... However, I think I'd get bored if I wasn't creating something new at all times. I imagine it's like that for all creative types. At least I hope I'm not the only one with Decorating ADD! 

So I ask you this question... Do you want to see my projects as they happen through their entire process (including my decorating ADD), or would you rather see just the post that shows everything with the Final Reveal?

Please comment, I'd love to hear your thoughts!

Blessings,

Diana


Garage Door Gets A Facelift


We just gave our garage door a much needed makeover/facelift. It's actually just a new fresh coat of paint and a warmer color. We used Behr Marquee exterior paint from Home Depot. The color I had mixed to match to a color called Sable from Sherwin Williams. This first photo shows you the newly painted door. 


Our garage door had become very faded and chalky from direct sun light beating on it. The old color was a boring drab dark brown which did nothing to help our homes curb appeal. You can see how drastic the before and after change is in this next photo.


This Behr Marquee paint is a primer and paint all in one.. It's supposed to be Fade Resistant. So hopefully the garage door will look beautiful for several years to come.


It's amazing how much improvement can be made with just a can of paint and a little work. I love the finished result! 


The fresh paint on the garage door made me realize that the shutters on our house are pretty faded too.  I'm thinking it might be time to freshen them up also. Although I'm a little leery of having my hubby climb on the roof to paint them, I'm pretty sure he will be up for it. 

Time for me to find a shutter color. They're currently dark green, but maybe a color with a bit of teal in it will look good.

What do you think?

Diana  

Model Homes with Character in New Anaheim

Have you ever considered looking at model homes for decorating inspiration? When I was younger I used to love looking through model homes and dreaming of the house we would someday own. Now that we are homeowners I still find I love looking at models for inspiration. 

Recently we visited some model homes in an area of Southern California called "New Anaheim". It's still technically just Anaheim California, and it's fairly close to Disneyland... In fact it's pretty close to everything Southern California. The area is called New Anaheim because this downtown district has been newly revived. Within walking distance are many shops, trendy boutiques, cafes, restaurants and art museums. 

The models we visited are called CASITA and Cortile (by builder Brookfield Residential). They are in the planned neighborhood of Colony Park in the Historic Colony District of Anaheim. The neighborhood has many resort like amenities that include parks, pools, cabanas, gathering and barbecue areas and even a dog park. 

Close by shopping, restaurants and entertainment areas include Center Street, Promenade, the Packard Building and Packing House, and Farmers Park where they have a weekly farmers market.

I loved looking though these model homes as it reminded me how much charm and character can be added to a home, even when it is a new build. 


Even though everything in this home is new, the brick veneer on the wall actually felt like that of an old historic home or loft space. Replicas of vintage pieces like the industrial table on caster wheels which could double as a portable island and also the vintage inspired lighting fixture added such a feeling of warmth and charm to the space. 


Each and every model was decorated in a way that made the homes feel as if they had a sense of history in them. I don't know who the decorator was on these, but I loved them so much it actually made both me and my husband want to buy one. Although that won't be happening any time soon, I will be going back to get additional pictures of the other rooms and the other homes.

I'll be sharing the inspiration!
Until next time,

Diana

Crafting Failure - What Not to Do

Have you ever started a craft or decor project and just not like how it was looking... only to continue and further dislike it? That happened to me for the first time this past week.

Each major holiday I usually craft a new wreath for our entry door. As we celebrate Independence Day (Fourth of July) here in America I love decorating with the traditional patriotic Red, White & Blue! So, two weeks ago I decided to come up with a new wreath idea (new to me). I have seen mesh wreaths all over the internet but I had never made one. I decided to give it a try. 

My first mistake was that I wasn't smart enough to look and see how people were actually making them, I just set out to do it all on my own. 

The first picture shows the materials I had purchased to make my wreath. It looked like a good start. I was going to paint the stars white and cover them in white glitter (which I already had). The mesh I was planning to gather, loop and tie around the wreath.  

In my mind, this was going to be so cute!!! However, I quickly discovered that the bright white wreath form looked horrible under the mesh. The mesh is very very see through. It didn't seem to matter how much I gathered and scrunched it around the wreath... I just kept seeing the white styrofoam still showing through. I was so disappointed with it that I just pulled it apart... which means I forgot to take a photo of my first failed attempt!


At about midnight I got the idea to use a wire coat hangar as my wreath frame. I bent and shaped the hangar until it was round and used the top as a hook where I would be able to hang it from. Since the mesh is so full and fluffy I figured the wire frame would work. And it did... 

I used thin craft wire to attach the mesh to the wreath frame (coat hanger). Every six or so inches I gathered the mesh and twisted a wire around it to fasten. When I was done with the blue I pushed it all together semi tight around the frame. I had planned the blue to be about 25% of the wreath and then the red/white the other 75%.


As I started adding the red and white mesh I realized that choosing two totally different size/thicknesses of mesh was a big mistake! The blue mesh was only 6" wide while the red/white mesh was 21" wide. Making many blue loops and then pushing them together made the blue look nice and full. 


As I got started with the red/white mesh it started looking lumpy and lopsided right from the beginning. Although it is not as noticeable in the photo, I just couldn't deal with the lopsided look. I walked away from it for a couple of days and then went back to it... but I still wasn't happy with it. I ended up pulling it apart. I am going to save the mesh for a future craft, but this is one project that I admit was a FAIL.

So this is pretty much a lesson in what not to do. But as long as I learned from it (and I did), then I guess it's not a total fail.

I know with a blog called Anyone Can Decorate, I shouldn't make mistakes :) But, I am real and I wouldn't want anyone to think that I always get it right. We all make mistakes, and it's okay!

Blessings,

Diana