Pages

Hot Chocolate with a Candy Cane Twist


I enjoy a big mug of hot chocolate whenever the weather is cold.  Around the holidays, I like to add a peppermint candy cane to it as a stir stick...  Along with a handful of mini marshmallows, it adds the most wonderful refreshing touch of mint flavor to this delicious hot and creamy chocolate drink!  I made this last night and it was so yummy!!!
I like to keep a mason jar filled with candy canes in the kitchen during the Christmas season.  They make a pretty decoration and are convenient to have close by.  They are good when used in both hot chocolate and tea. 


When you stir the cocoa with the peppermint stick in the hot cocoa the mint flavor infuses itself into the drink.  The more you stir, the more the mint will melt, which strengthens the mint flavor.  I like just a touch of mint, so I stir for about 25 seconds and then I remove the candy-cane.  It creates the perfect mint and chocolate blend for my taste.

If you like mint chocolate, even a little bit, then you will love this delectable treat.  


If you haven't tried peppermint in your hot chocolate, I highly recommend giving it a try!  


Antique Post Card DIY Christmas Trees


My mother used to collect vintage and antique postcards.  She gave me a box full of them about five years ago.  Most of the dates on them are from the early 1900's.  I always figured I would use them on some craft project eventually, I just didn't know what or when.  This week I decided to finally craft with them.  I came up with the idea for these adorable antique postcard Christmas trees.  After a little trial and error, I figured out how to make them and they were actually quite simple to do!  The best part is that they didn't cost me a cent...  I used items I already had around the house :)

I started by creating cones with some scrap-booking paper and packaging tape. I used two pieces of 12" x 12" paper and put them into a cone shape and then taped the edges.  I wanted the cones to be taller than a single piece of paper would make, so I shaped the first piece and taped it, and then put the second piece inside and shaped it to the first giving it extra height.  Then I added a cut piece to the open area that remained.  I cut the bottom level and then I made a second cone that was slightly shorter.

  
My cones aren't very pretty, in fact not at all, but they are just for the base so it didn't much matter what they looked like.  I ended up taping the entire exterior of each cone to give them extra strength.


I cut each of the old postcards into strips and then curled them around a pen to give them a curved look.  As I cut the cards I tried to keep stamps and postal markings in tact so they could be read when looking at the trees.


After they were curled I started from the bottom up, one row at a time...  I used packaging tape to tape each piece to the cone. 

Below is the first tree as I finished it.  Notice how you can see the stamps and postal marks.  There are dates from as early as 1905 to about 1915 on this tree.  All of the stamps were one cent back then.  


The second tree I decided to give a different look.  I folded each of the cut strips in half and stapled them.  This gave them some thickness.  Again I made sure to show the stamps and postal markings.  Row by row I attached them with the packaging tape.  I used packaging tape because it is much stronger and stickier than Scotch tape!  This second tree was the easiest to make.  It didn't need near as many rows to I made it in about 15 minutes.


In the next picture you can read some of the writing on the cards, and see the stamps up close and postal dates.  


The stars on top I cut out of postcards too.  I cut two sides for each and I glued them to the top of each tree.


I love how they both turned out.  I am not sure where I am going to display them in the house yet.  I'm thinking maybe the coffee table is best.  There is so much history on the 100 year old post cards that they make for a great conversation piece!


Until next time,
Happy Decorating!

Diana

Happy Thanksgiving

Happy Thanksgiving to all of my friends, family and followers.  Thank you for being a part of my life!  


Blessings to you and yours...
Diana
- xo -

Simple Mason Jar Candle Holders

I have an obsession with mason jars.  I use them for just about everything!  Here are some simple mason jar candle holders that are super easy to make and beautiful for the holidays.  I put Epsom salts in the bottom of my jars to hold the candles up.  The Epsom salt looks like snow, but it doesn't melt and is relatively inexpensive.  You can find Epsom salt at any pharmacy and at most grocery stores.


I quickly put these together last night and will incorporate them into my Thanksgiving table (which I will share with you tomorrow)...


I let the candles burn for awhile so I could get them to the height I wanted.


Wishing you and yours a wonderful Thanksgiving Holiday!!!

Blessings,
Diana


The Christmas Tree Debate - Real or Fake???

Calling an artificial Christmas tree "FAKE" is probably a major faux-pas but in reality that is what an artificial tree is, a FAKE.  Most people have very strong opinions on weather or not their Christmas tree will be real or not.  I think pretty much everyone loves the smell of a real Christmas tree!  I know I do :)  But depending on where you live, gaining access to quality real fresh Christmas trees can be difficult.  

We live in Southern California... not exactly the pine tree capital of the world.  Buying fresh cut Christmas trees here means that they have been cut somewhere out of state, shipped via trucks, sat in a lot waiting to be sold, and then by the time you get it home, give it a fresh cut and put it in water, you are lucky if it lasts more than a week!


I once purchased a 12 foot noble fir, which is my absolute favorite kind of tree (I like the layered effect so ornaments can be put deep into the tree).  The tree cost well over $100.  I spent a full day decorating the tree.  It was stunning!  About five days later it started getting crispy and needles were falling out.  On day seven, I went to the lot where I purchased it, told them that my tree was basically dead, and they told me to bring it back for a replacement.  I had no choice, Christmas was still two weeks away and the one I had at home was a major fire hazard!  I had to completely un-decorate the tree and haul the 12 foot beast back to the lot, where I proceeded to exchange it for a replacement.  The lot owner told me they just got a new batch of trees right off the truck and they were fresh from the grower.  He put a fresh cut on the bottom, I took it home, put it in water and spent another day decorating the new tree.  Seriously, they first time was enjoyable, but the second time decorating basically the same tree was not what I wanted to be doing!!!  I admit I was a bit irritated, but at least I had a fresh tree.

I put water in the tree stand daily.  But, a week later, I had a crispy, near dead Christmas tree in my house.  The exact same thing had happened.  The last week until Christmas we left the lights off because it was not safe to have them on. We live in Southern California and it's usually sunny and warm.  On Christmas day my husband is usually in shorts, because we really don't get much of a winter.  I guess "fresh" trees don't travel well getting here and they just don't last very long.  I prefer to have a tree up the day after Thanksgiving all the way till New Years.  One that lasts through the entire holiday season!

Needless to say my experience with real Christmas trees came to an end that year.   I have since had a couple of artificial trees. 

Artificial Christmas trees have come a long way.  There are many different qualities, styles and price ranges to choose from.  Some of the higher end trees look so realistic that you cant tell that they are fake.  Look at this picture of the pine needles from a high quality artificial tree that I found on BalsamHill.com.  My dream Christmas tree would be one of these but unfortunately my budget isn't going to allow me one this high end.  However, when the day comes that I can afford one of these beauties, I would love to get one!

Look at this Sugarlands Spruce also from Balsam Hill.  The realism is amazing!


Since that Christmas trees scent is the one thing missing from fake trees, last year I used pine ScentSicles to add a Christmas tree scent to our tree.  They are little pine scented sticks that you hang near the interior of the tree to make it smell real.  They are rated pretty high as most people are very happy with their smell.  


For this year I am looking for a taller tree because our house has 9 foot ceilings, and my current tree is only six feet tall.  Although I have found a few dream trees, they aren't in my budget.  So I have been looking this past week for something that still looks real, that is tall, that I can afford.  I am hoping to find it in the next few days.  I'll update you when I do.

In the meantime, I'd love to hear your thoughts on Christmas trees, REAL vs. FAKE... Which do you prefer?

Blessings,
Diana

DIY Mason Jar Snow Globes - Anthropologie Inspired

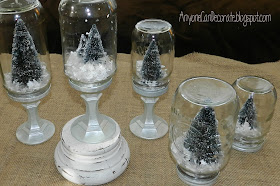
I saw the cutest mason jar snow globes on the Anthropologie website.  I have a bit of a Mason Jar obsession, so I pretty much wanted them!  Being that they were from $25 to $40 each, I decided to make my own budget friendly version... And I fancied them up a bit by putting pedestals on them.


I made two different versions of the jars... Both Christmas tree snow globes and pine cone globes.


After I finished making the pine cone globes. I sat them on top of a pair of vintage Pottery Barn pedestal style tarnished silver candle holders.  The jar lids sat on top of them perfectly.  I love the way they look!


I thought I'd give you a quick tutorial on how to make these little beauties?   It was so easy!  I already had several vintage mason jars and jelly jars.  I also purchased some new mason jars to be sure I had plenty on hand.  At the Dollar Tree store I picked up four glass candlesticks for $1 each.  

I went to Michaels Craft Store and purchased a large bag of bottle brush Christmas Trees (on sale of course!)... and also some iridescent glitter and a bag of fake snow.


I used Martha Stewart all purpose craft paint (works on wood, glass, metal, all surfaces), to paint all of the lids and the glass candlesticks that I planned to used as pedestals for some of the jars.


I painted a super soft aqua blue color for the first coat of paint, then I followed up a second coat with a pearl color.  I wanted the bases to have an icy look to them.


After all of the lids and bases were painted and dry.  I glued trees to the inside of the lids (leaving enough room to screw the lids back on their jar).  Then I glued some of the lids to the pedestals I had painted.  I used Gorilla glue since it is waterproof and super strong. (Note: You must follow gorilla glue instructions for use).

After the glue was dried I put about an inch of the faux snow (called Frosty Snow) and sprinkled a bit of glitter into each of the jars.  Then I screwed them onto each of their lids.  


If you are wondering, these are water-less snow globes.  They are not the kind you shake and watch the glitter snow fall.  These are pretty much just for looks... and I love the way they look!   They look like ornaments on display and the glass shows them off beautifully!


I was trying to decide which was my favorite, but I really do like both styles so much I can't decide!  How about you, do you have a favorite?


I'd love to hear from you!

Blessings,
Diana


Sharing this post at:

Savvy Southern StyleThe Brambleberry Cottage

Thanksgiving Family Fun - Alphabet Game

For Thanksgiving, I like to have a time where everyone shares what they are thankful for.  I make a game with it and it always turns out to be so memorable and allot of fun. The kids especially love it and sometimes they get very creative. 

On a piece of paper you write the alphabet down the side or you can use my printable for your use (PDF Printable Here). Everyone has their own sheet and each person has to come up with at least one word for each letter of the alphabet that describes what they are thankful for.  I pass out the papers early in the day, so everyone has plenty of time to think about it.  Later, at meal time we go around the table with each letter of the alphabet and say what we are thankful for.  It makes for great memories and fun table conversation!


Here is an example of what a list might look like:

A - Ability (to do things that others can't); A child might say something like "apples"
B - Britney (my youngest daughter), My young neice once said "bed" (having a bed is
       something most of us take for granted) a child often remembers the little things...
C - Country (living in the USA), Car (allows us to go where we want easily)
D - Daddy
E - Electricity
(I love candlelight, but even more the ability to flip a switch to turn things on!)
F - Faith, Family, Friends
G - God

H - Health, Happiness
I - Imagination
J - Jim (my amazing husband)
K - Kids
L - Love, Laughter
M - Mommy, Massages
(etc....) you get the idea.... 

I encourage you to try it. You'll be surprised how much fun it is and how much everyone gets into it!  It is such a joy and a blessing hearing what each person is thankful for. 

What are you thankful for this year?

Blessings,

Diana


Sharing this post at:

Vintage Mirror Wall Using Flea Market Finds


I've gotten many vintage mirrors and picture frames from my local flea market. Mirrors and frames depending on their size and quality usually run anywhere from $1 to $7 at the flea market in our town.  I love getting such great deals!  They usually need a bit of cleaning up or painting, but they have so much charm and character, I love them!  These mirrors each measure over two feet tall.  This first picture has a larger full length mirror (black frame) on the left.  I am not keeping this particular mirror as the frame is too thick, but I do like the idea of having a taller mirror in the bedroom so I can see myself full length when I get ready.


When finding vintage pieces at flea markets, swap meets, yard sales and thrift stores, try to look past the ugly paint colors and finishes on frames or the ugly pictures in the frames.  You can always paint the frame and remove the pictures.  Here are a few frames that I found that had pictures and glass in them.  After I removed the pictures, they looked so much better!


I played with the different mirrors and frames on the wall quite a bit.  I moved them around into different positions until I finally decided on a look that I like.  This picture was the first look I tried.  It felt a bit too triangular for my preference.

I removed the bottom oval frame and I liked the layout better but felt like something was still missing.  


This is the what I finally came up with.  I like the way the wall currently looks (except the black mirror on the left side).  I do want to keep a tall mirror on the left, but I need to find one with a thinner frame and most likely in white.  It may take awhile to find the right mirror, so for now, this is how I am keeping it (because it functions well).  I can actually see what I am wearing from head to toe for the first time in over 2 years.


My next bedroom makeover project is that wood cabinet (armoire and bookshelves) you see at the left of the pictures.  I am working on painting it and distressing it.  I should be able to reveal it sometime next week.

Until then,
Happy decorating!

Diana