Pages

DIY Holiday Mirror Idea

I came across this picture a few years ago and I absolutely loved the mirrors with the letters JOY on them. I knew that someday I wanted to do this same thing in my master bedroom. I finally got my three mirrors. They have a gilver frame (Yes, I said GILVER, which is a term that I learned while watching Rachel Zoe... it's a name for goldish silver, which is quite popular these days). Not that I normally get educated watching reality shows.. but every now and then, I can't help but pick up the lingo (lol). Now I need to get to the craft store for some letters! These letters appear to be glued to the mirrors. I will be hanging my letters with ribbon so they can be removed after Christmas. Yes, I am being a bit of a copy cat... However, when you see a good idea, there is no reason you can't do your own version of it! That is what is so nice about looking at photos for inspiration... Sometimes we find exactly what we want to do :)


Now, back to working on my Christmas decorations...  More to share soon!

The Christmas Porch

One of my favorite places to decorate for Christmas is the front door and the front porch. There are so many creative ideas and ways to DIY decorate for the holidays. Below are some pictures to help you get inspired.

This first picture is beautiful with all of the natural elements... garland, greenery and pine cones. The ice skates and sled add a nice personal touch! I found it via: Naps on the Porch...


Even if you don't have much of a porch. Always remember to decorate the entry door. I usually use a traditional round greenery wreath... but, for something a little different this square wreath is a fun and quirky option.


I always love garlands and greenery around the entryway... These fruit topiary trees in urns are a nice addition. The red ribbon in the garlands add a great pop of color!


This porch is stunning with all of the natural branches... dripping with snowflakes, and candle lanterns. I especially love the mercury glass lanterns and candle holders. The artificial snow looks so real!


Here is another good use of greenery swagged across the doorway. To liven it up I would add a few ornaments or berries... and maybe some ribbon.


 This porch, via: Southern Living, is cute with all of the wrapped presents and toys. When putting presents on your porch, just wrap empty boxes (this might be obvious... but I thought I would mention it). A little DIY trick: when the holidays are over, you can store the wrapped empty boxes in a giant trash bag for re-use next year. That way you aren't wasting a bunch of wrapping paper and bows... (my contribution to being green).


This next picture has many cute Christmas cottage signs.  They are from Cottage Art Shop. I bet the rocking chairs with lights look adorable all lit up at night.


Giant ornaments hanging from the porch are a fun decorative display.... They give a sort of chandelier effect. You could also make an ornament chandelier and hang it from overhead if your porch doesn't already have a hanging fixture. If it does, you can add a few Christmas ornamenta hanging from the fixture. Just use ribbon, or fishing line to tie them up. Dangling them at different heights really shows them off!


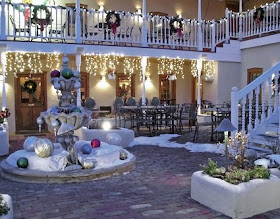
This next picture is one of my favorites. I have always dreamed of having an entry courtyard. This one is all decked out for the holidays! I am lovin the giant ornaments and snow in the fountain and the faux snow around the edges of the patio. Super cute...


I'm still decorating around my house... I've been a little under the weather, so it's slow and go, but I will post pictures once it is all done.  I hope you are inspired to get decorating on your home.

Have fun and Happy Decorating,

Christmas Decorating Inspiration

The day after Thanksgiving, this is the day I get all of my Christmas decorations out and get started decorating the whole house. It will take several days to get it all done... But it is so worth it! I love the feeling of walking in to the house and seeing all of the lights and warmth that the Christmas spirit brings.. Below are several Christmas inspiration photos that I wanted to share. I hope they inspire you to get decorating...


(pictures via: tumblr, original sources unknown)


I will post pictures of my home after all of the Christmas decorations are up....
Happy decorating!

Happy Thanksgiving

The Thanksgiving table is decorated... Here is the preview, before all the food and drinks arrive. Now I will spend the day cooking with my mother and my two daughters. We will spend the majority of the day in the kitchen preparing amazing food for a meal that will be eaten in about 20 minutes time. But, we will have all those great leftovers for like a week! It will be wonderful spending the day with my family and loved ones. I am very thankful and so blessed to have such a wonderful family!


I wish you and yours a very wonderful and blessed Thanksgiving celebration!

Linking up at:


Thanksgiving Game for Family & Friends

With Thanksgiving being tomorrow, this morning I was thinking of all that I am thankful for. We are so blessed and we take so much of what we have for granted. Remember this Thanksgiving to think of all the blessings you have, even the little one's.

On Thanksgiving, I like to have a time of sharing what everyone is thankful for. I make a game with it and it always turns out to be so much fun. The kids especially love it and are so creative. On a piece of paper you write the alphabet all the way down the left side of each persons paper (lined paper works best)... Or you can print (via your computer) the alphabet on paper ahead of time. Everyone has their own sheet of paper and each person has to come up with at least one word for each letter that describes what they are thankful for. I have everyone start their list early in the day, so they have plenty of time to think about it... and then at the dinner table (makes great table conversation), we go around and share every letter and what each person came up with.

Example:

A - Ability (to do things that others can't); A child might say something like "apples"
B - Britney (my daughter), My young neice once said "bed" (having a bed is
       something most of us take for granted) a child thinks about the little things...
C - Country (living in the USA), Car (allow us to go where we want easily)
D - Daddy
E - Electricity, I love candlelight, even more the ability to flip a switch to turn things on!
F - Faith, Family, Friends
G - God
H - Health, Happiness
I - Imagination
J - Jim (my amazing husband)
K - Kids
L - Love, Laughter
M - Mommy, Massages

(etc....) you get the idea.... Try it. You'll be surprised how much fun it is... And everyone enjoys hearing what each person is thankful for...  What are you thankful for this year?

Wishing you and yours a very blessed Thanksgiving Holiday!!!

Plastic Chairs for Thanksgiving? Dining Table Status

For those of you that are wondering how the dining table and chair renovation project is going. The table is finished and it made it into the house. However, the chairs are still a work in progress. We had to custom order trim for the upholstery edging and it has still not arrived. It was ordered over two weeks ago, but the turn around time was 2 to 4 weeks. So I guess we will have it done for Christmas instead of Thanksgiving. This Thursday we won't be using our formal area. I  really don't want to use it until it is fully completed... And.... somehow sitting on plastic yard chairs doesn't exactly scream formal... Lol. I am not decorating this room until the chairs are fully done. We have a nice bar height table that seats up to eight people in our kitchen nook, so it will work fine for Thanksgiving. Often, projects have delays that are beyond our control... I've learned to just go with the flow! I will post the finished product (before and afters) of our dining room once we fully complete it. We should have the chair trim within the next two weeks, therefore we should have the project fully complete for Christmas.

Wishing you all a wonderful and blessed Thanksgiving Holiday..

Getting Ready for Thanksgiving


We are hosting Thanksgiving at our house this year. I have been very busy trying to get everything ready as our first bit of company arrives tomorrow. I just finished all of my grocery shopping for the holiday and for this week. My grocery bill was by far the largest it has ever been! I knew I had a lot to buy, but I had no idea how much it would cost. I used one of those double wide carts (the kind that hold two toddlers in the upper seat). Only I didn't have any toddlers, I just had lots and lots of stuff! I shopped with a grocery list and rarely strayed from that list. Other than remembering that I needed yams and brown sugar, which I had forgotten to include on my list, I pretty much stuck to my plan. The double wide shopping cart was loaded to the max... I snapped these pictures about 15 minutes before I was done with the shopping. People were actually saying things to me in the store about how full my cart was... One one little girl said "Wow, that is a lot of groceries"... I just smiled and said, "Yes it is". I figured when I got through the checkout the total was maybe $300... and I was hopeful it was less. After all, many of the items were on holiday special, so I was getting several bargains. I was shocked when the checker told me, $403.00 (Ouch!!!)... But, I had to do it... but darn, that could have been an amazing shopping spree elsewhere!

It took two carts fully loaded down with packed bags to get it to my car out in the parking lot. And guess what? Lucky me, it was pouring down rain when I exited the store. I got soaking wet, the groceries were all soaking wet, but it was actually a fun and memorable adventure. Here in Southern California we don't usually have much rain... We don't really plan for rain. In fact we rarely carry an umbrella (if we even own one). Anyways, all is well... The groceries and made it home and my wonderful hubby helped me put them all away <3

Next, I'm off to make dinner and then finish a few decor projects before company arrives.


For Thanksgiving dining table inspiration, be sure to view this post:
Thanksgiving Table Decorating Ideas


 Until next time...
        Blessings,
      

Learning How to Make a Cute Blog

Makin Cute Blogs |  Freebies, Tutorials, Resources, & Design Elements!Hi all.. I've been away for the past two days. With Thanksgiving coming and lots of projects going on I've been super busy! Also, I've started watching a video course that I purchased. It's called Makin Cute Blogs. I want to improve the look and feel of my blog. I had thought of using a Blog designer for a custom blog, but I am a creative person and I really want to be able to make improvements and changes myself, so I decided to get the course. So far, I am through the first four sections and I am very impressed with all that I am learning. The course at only $75 (this month, then it will be $99) is well worth it! I hope within the next two weeks to have a new, more professional blog design here. I won't be able to do much before Thanksgiving. I will likely start my new design the day after, once my company leaves :)  

If you have your own blog and are considering making it a little more fancy or are just looking to learn how to do more with your design, I definitely recommend checking out the site Makin Cute Blogs. Also on her site are lots of freebies that you can use when designing your site... I don't get any kind of kickback for recommending the site. I am just so happy with it, that I wanted to share the information with all of you. I hope you will check back here soon to see my new design. I am excited to see what all I can do with it!


P.S. - The signature at the bottom is something I just learned how to do :) Yeah me!

Until Next Time...

Flea Market, Thrift Store & HomeGoods Finds

We purchased a new home last year... and like many newly built homes we have a couple of empty niches around the house that I have been working to fill. Built In's are way too expensive, so I have been coming up with creative ways to fill these spaces.  We were very blessed to find a home with a good size walk in pantry. I admit that I love having all the extra space!  Recently I found this great plate rack shelf, believe it or not,  I found it at Homegoods and it was on clearance (woo hoo... I love a good sale). I bought it on the spot, guessing it would fit... and lucky me, it fits perfect.  It makes for a great display area in my pantry niche. The pantry walls could definitely use some color on them, but paint will come in time. I have too many other projects that take priority. 

The antique linens on the shelf were all given to me by my mother who has collected them over the years from thrift stores. I think she has hundreds of them, so she gave me a few (love you mom!!!). The silver goblets on the top shelf were my late grandmothers. They are special to me. The random white and ivory plates are hand me downs and inexpensive thrift finds. I like to mix and match whites in my place settings.


Even with all my busyness I manage to find time for thrifting and an occasional trip to our local flea market. It's hard to believe that when I was a child I pretty much hated my mom dragging me along into every thrift store and antique or collectible store she could find. Little did I know, that I would become obsessed with the same passion. A few weeks ago I found three copper tea kettles at the flea market for only $5 for all three. I have spaced them out above my kitchen cabinets. I love vintage kitchen stuff! Also on top of the cabinets is an old coffee grinder with copper parts that I recently picked up for $8. The cake and flour tins are reproductions, made to look old, also found at HomeGoods.


Aqua is one of my favorite colors. I have pops of it throughout our house. These aqua pitchers are both recent finds of mine. The large pitcher I found at an antique store. I have no idea how old it is, but it is definitely vintage and it was only $8, so it was a great deal. The small pitcher was $4.99 at HomeGoods. I find that HomeGoods, Marshalls and TJ Maxx are great places to find inexpensive home accessories.

To decorate above the cabinets I just randomly spaced different items that I love across the top until I liked the way it looked. Someday I hope to have crown molding around the kitchen and a contrasting paint. I have lots of ideas... My hubby and I are working on each of them one at a time.

Until next time...
Happy decorating!

9 Days Till Thanksgiving... I Need to get my Rear in Gear

I can't believe it's November 15th already! Thanksgiving is only nine days away and I am hosting Thanksgiving at our home this year.  With family coming the night before, I have so much I still need to do to get the house ready... (Ahhhh, insert panic here!). That means I only have eight days to get everything done.  

Finish the dining table restoration, sand, paint and upholster all six chairs, trim upholstery edges on chairs (that is, if the trim arrives in time)... make the curtain panels for the formal dining room, clean the house from top to bottom so it looks great when our company arrives (oh, how I wish I had a maid!!!), plan the Thanksgiving menu (ie- breakfast, full Thanksgiving meal, snacks for mid day, drinks, then do all the grocery shopping and when I'm done, pray I didn't forget anything. Oh yeah, dessert... I absolutely can't forget the dessert!  Whew, I'm pretty much exhausted just thinking about it...

We are still working on the dining table renovation project.  The table is almost done, it just needs a the final clear protection coat on top. The dining chairs are still being sanded which is a major project since the legs had been beaten up from many years of kids toys banging into them. The goal for this dining table, plus the three leaves and six chairs is to get it all finished in time for Thanksgiving. However, we do have one potential hiccup! It all depends on whether or not the trim that I had to custom order for the chairs will arrive or not. I ordered the trim about 9 days ago and Joann's store said it would take anywhere from 2 to 4 weeks to get here. So, I am holding out hope that it will arrive this weekend.. (Insert a prayer here).  If it does not arrive, it will be plastic yard chairs in the formal dining room... Somehow it just won't be the same... But, either way we will make the best of it!  

When we found the set via Craigslist, I figured upholstering the chairs would be super easy. In the past I have removed seats from chairs and just used fabric and a staple gun... wrap the fabric around the seat, staple to the back... it was super easy. However, when we discovered that our chairs all are made with strapping and have springs inside, there was no way to remove the seat to reupholster (uhh ohhh), but I didn't panic, I just went to Joann's and found a book on How to Upholster. It covers exactly how to cut the fabric, how to tuck it in, how to nail it, how to trim it... etc..., so I'm hoping and praying that it won't be too difficult.  It is definitely way more involved than the prior chairs I have covered, but I am always up for learning something new!   


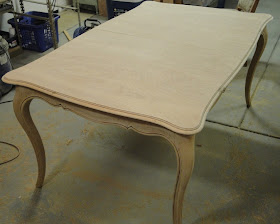
No matter what I know the dining set will turn out beautifully... The table has already had a major transformation! Do you remember the before pics... I have put the before and after below just to remind you.  Wow, when we found the table I couldn't stand the honey color finish on it... It reminded me of furniture I had in the 80's and 90's, golden oak and honey pine (no offense to anyone who still likes those colors).  Given the shape and frame of the table I knew it had tons of potential. I love how it looks now.  I can't wait to get it in the house!

 Table Color Before Refinishing

After Sanding Down to Raw Wood...

After Stain and an Antique Glaze

Alright, I suppose it is time for me to stop blogging and to go and get my rear in gear.  I just have to figure out which item on my list to do first. Wish me luck...

Blessings,


Easy DIY Holiday & Christmas Treats

I've been looking for picture ideas and inspiration to make easy DIY Christmas sweets and treats... Here are some of the best I came across.  Many of these treats make wonderful gifts... and bonus... they are budget friendly too.

This first one needs no explanation... Candycanes dipped in dark chocolate, white chocolate drizzle. Peppermint and chocolate... So Yummy!!!

Melting chocolates can be purchased at most craft stores (Michael's and Joann's Superstore have them in the cake decorating section) and also most baking supply stores have them. I've also seen them at Walmart. Melting chocolates come with melting instructions on each package. Most can be easily melted in the microwave. I like using an electric hot plate under several coffee mugs. It is a great way to have different colors and flavors of chocolate all melted and ready for use at the same time... A hot plate or warming plate underneath is also a great way to keep them melted for as long as I am using them. If you are making a lot of treats (like some for everyone you know), you might use a small crock pot. Note: chocolate will re-harden when it cools.
The technique used on these chocolate dipped pretzel sticks is easy to do. Dip the pretzels into your melting chocolate, then place flat on a sheet of wax paper. Apply sprinkles to the top immediately after dipping the sticks, that way the sprinkles will stick easily. The swirls and stripes across the top, I prefer to do with a spoon... Your chocolate must be well melted (a little runny), put a little on the spoon, then just hover the spoon back and forth above the candy and allow the chocolate to drizzle down onto the pretzels until you achieve the desired effect. This same technique is used for decorating many chocolate candies and Chocolate covered strawberries too... When covering strawberries, rasberries, cherries and any fruit, keep in mind that fruits dipped in chocolate should be eaten within a few days of covering. I keep mine refrigerated as I like serving them chilled. Chocolate covered candies are enjoyable all year round, just change up the sprinkle colors and designs depending on your holiday or celebration. (St. Patricks use green clovers, Valentines Day add heart sprinkles, Easter used pastels)... You get the idea ;)


Chocolate covered strawberries...
Chocolate dipped shortbread cookies...
  
Chocolate dipped marshmallows with peppermint sprinkles... Apply sprinkles while the chocolate is still wet... (source: Rose Bakes)
If you chill the marshmallows in the refrigerator before dipping, they won't melt when you put them into the warm melted chocolate :) Then you can refrigerate them to harden the chocolate quickly.
Chocolate covered Marshmallow Reindeer.. marshmallows are dipped in milk chocolate, the pretzel antlers are dipped in dark chocolate, candy eyes, m-n-m nose (red nose for Rudolf). You can use a little melted chocolate as your glue to put the items together. Sucker sticks can be found at your local craft store in the cake/candy decor section.
Other cute Christmas holiday treats... include Christmas tree pops, peppermint bark, chocolate cookies dipped in white chocolate with crumbled peppermint sprinkles and Rudolf the red nose reindeer cookies...


Most of these pictures were found on Tumblr and I don't know their original sources.  If you baked any of these, I'd love to hear from you and give you credit on my blog.

Blessings!