Pages

Decorating Dreams and Inspirations

I think we all have decorating dreams.... maybe a dream room we would like to create or a dream style that we would like to put into our home or space. However, we don't always know how or where to start.  I find that assembling pictures of the furnishings and decorative accessories, along with paint samples and fabric samples into one place helps me visualize my space and see what looks best together.

I used to subscribe to several decorating magazines. In addition, I would often purchase an issue of a magazine at the checkout of the grocery store for just one picture that I loved. After looking through each magazine, I had a hard time parting with any of the older issues because there were always a few pictures or ideas I didn't want to forget. Eventually I had piles of magazines around my apartment. I had to find a way to condense and organize all of my favorite pictures and articles. I started by cutting out my favorite things from each magazine and then discarding the rest of each issue. I bought a large three ring binder and tons of clear sleeves. The clear insert sleeves made it easy to slip pictures and pages into my binder and move and organize them as I added more. Whenever I need decorating inspiration I refer back to my binder.  Now when I find a picture I love I print it off the net and add them to my binder. Also, I must admit that when I'm at the grocery check out and I see a magazine that I love a picture in, I snap a picture with my cell phone camera and later print a picture for my binder.   I know that is cheating a bit, but I don't usually want to purchase the whole magazine.

A great way to assemble your thoughts and decorating ideas for a specific room is to create a inspiration styleboard... either electronically or on a bulletin board. A fun place to make digital inspiration boards in on HGTV. Go to their site and search for "Make a styleboard". There are hundreds of digital images and ideas for you to view and to use to create your own dream idea board. Below are a few pictures of styleboards from HGTV.


Blogging... It's New To Me

This blogging thing is new for me.  Yes, I am a complete newbie!  This is my very first month.  Each day I find myself playing with my page layout, background colors, adding advertising and other stuff... I'm just trying to decide what I like and what I don't... and I pretty much keep changing my mind.  I imagine at some point I will get it dialed in.  I think I currently have too many ads on my blog but again, I am still trying to figure out what is what.  I hope those of you that visit can put up with my changes!

I am here to have fun and share with others a few decorating tips, tricks and I hope to inspire others as I too get inspired.

I'm looking forward to chatting with some of you.

Blessings,
Diana

Color That Inspires

What color inspires you?  For me lately, it's been Tiffany blue (which is sort of an aqua or light turquoise).  I just can't seem to get enough of it.  No matter what I see it on it gets me excited.  I do have some aqua in my home, but I am going to use it in my master bedroom on the walls soon.  I can hardly wait!!! Here are some pictures that I find very inspiring...


(photo sources: Tiffany & Co., infinitelyinlove.tumblr, xonikkixo. tumblr, obscured.tumblr, osnapsjohn.tumblr, weheartit.com)

Craft Room Organization Inspiration

I wanted to share a few great craft room inspiration pictures that I came across.  I pulled these while trying to find inexpensive ideas to help me get organized!  I am lucky that I do have a great craft room, but I definitely have some organizing to do.   I love these pictures and look forward to incorporating some of these ideas!


I found this shelf at Michaels Craft Store for only $40 with their coupon

(picture sources - MyIdealHome.tumblr, TheRobinsPerch.com, SkipToMyLou.org, SpunkyJunkie.tumblr)

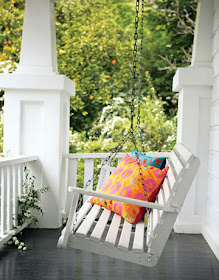
Inviting Porch


Look how adding just a few decorative accessories to a basic porch transforms it into a warm and inviting space. Even though it is snowing, I want to curl up in the blanket throw with some hot chocolate (with marshmallows of course) and read a good book.  This same decor could work inside as well, either facing a fireplace or facing a window looking at the amazing view.  In any sitting area, just add a couple of decorative pillows and a blanket throw or two to create an inviting space of your own.  If you keep your furniture neutral you can change your pillow and throw colors and styles depending on the season or holiday.  By changing the decorative accessories you can change the entire look and feel of your space.  Happy decorating!!!

Camping and Decorating the Campsite

This past weekend we went camping near Lake Arrowhead in the San Bernardino Mountains.  After setting up camp late Friday afternoon, we went to dinner at our favorite restaurant on the mountain, ate great food and had wonderful conversation.  Saturday morning we had a french toast breakfast at camp, then we spent the day visiting with family and old friends, had a barbecue on the dock and went boating on the lake.  Saturday night was spent visiting by the campfire talking and making smores.  Then Sunday morning my amazing husband made breakfast for all.  After we packed up camp, we went shopping in the Village and then headed home for a long nap.  We had a great time and are looking forward to the next time!!!

Although I did not take many pictures this weekend, Below I describe how I decorate our campsite and I've included some inspirational pictures of things you can easily do too.  Many of the ideas work for both camping and picnics.

When we go camping I like to decorate the campsite.  I don't overdo it, but I definitely have to put my touch on things.  We camp the old fashioned way with a tent.  We do bring air mattresses so we aren't completely roughing it.  I like to bring bedding and a few throw pillows for the beds along with a blanket throw across the bottom to make it feel a little like home.  In the tent I add a few of the battery operated tea lite candles for a little ambiance.  Around the camp I like to use inexpensive solar lights to light our path at night.  On the picnic table, I put a tablecloth and a centerpiece.  Mason jars work great for candles and to hold flowers.  I don't go as far as to bring an area rug, but I have considered it.  Mason jars with wire around the top can be hung from the trees with tea lite candles to add a warm glow to the space (if fire is too dangerous you can use the battery operated votives in the jars).  A few blanket throws on the folding camp chairs are wonderful to snuggle with next to the campfire.  Most of all I just have fun with it and everyone seems to enjoy the effort.


There is also what is called Glamping as is shown in the picture to the left.  There are campsites that have permanent tents that are fully decorated.  For those who would rather just show up and have some fun, try Glamping.  It can feel almost like a 5 star resort, but you get to enjoy nature, a campfire and the stars.

Look up Glamping via any search engine for a Glamp Campground near you. Whatever you do have FUN!


(Photo credits: juicybits, thingsinmasonjars.tumblr, emilylight.tumblr, stephaniericci.tumblr, elizabethandesigns, enthusiasticallyours)

Away on Vacation... New Posts to Come Monday.

I am so looking forward to this mini vacation we are going on this weekend! We are heading to the mountains for our end of summer camping trip.  I have been packing all day and we are headed out soon.  I just wanted to let you all know that I will be back with a new blog posting on Monday.  I hope you all have a wonderful and fun weekend!  God bless...  Diana

Outdoor Living - Design Inspiration


When designing an outdoor space you should treat it just as you would an indoor space.  Create yourself an actual outdoor living and/or dining room.  Be sure to include seating, pillows, linens, lighting and decorative accessories.  Using  an outdoor area rug can help to ground and define the space.  You can change up the accessories and linens depending on the season or holiday.  Have fun with it!   I've included a few pictures to help you get inspired.


 (Photo 1 - sueswink.tumblr.com, Photo 2 - Hutch Interiors, Photo 3 - cozyandlovely.tumblr.com)


Bookshelves - Not Just for Books

Bookshelves are a great way to display your favorite items. Try mixing a variety of books with decorative decor, art, architectural pieces and framed photos into the mix.  Don’t be afraid to move things around and play with different vignettes within the shelves until you find a look that you like.  If it seems difficult at first, it will get easier and you will develop an eye for making beautiful displays.  If you have a lot of books, place groups of them both vertically and horizontally throughout the shelves.  Horizontal books can be used underneath other decorative pieces to add height and interest.  To add extra dimension to your shelves you can paint the back wall of the bookshelves  in a contrasting color.  You can go subtle or bright depending on your color preference.  Happy decorating! 


.(photo sources: Chicago Home + Garden, frecklesandivory, Blue Interior, DIY Revolution)

Home Goods - Great Decor Source

Finding great accessories is key to decorating a beautiful space.  I've found that HomeGoods is a great store to find decor items for any room!  They have a huge selection of bedding, linens, art, mirrors, lighting, area rugs, small furniture pieces, kitchen wares, seasonal decor items and more.  They carry a variety of styles and are reasonably priced.  (Note: If you don't have a Home Goods in your area, try a T.J.Maxx or Marshalls decor department.)  Happy Shopping!!!

Design Tip... Picture Ledges

Picture ledges are a wonderful way to display a photo wall or home art gallery.  Since placing framed art on the ledge doesn't require putting holes into your walls, you can easily change out and move around your art/photos as often as you like.  
If you have children, try framing their artwork and displaying it along with your other pieces.  It will encourage them to continue to be creative and it adds great personalization to your space.
Although photo ledge shelved can be found at several stores, I have found that Ikea has ledges that are very reasonably priced.

Complete Baby Nursery Under $500


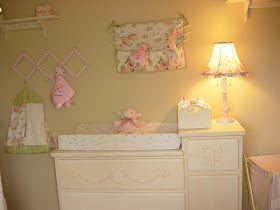
This entire baby girls room was decorated for less than $500.  The crib and mattress were purchased new. The Bellini dresser/changing table was found at a garage sale for $60, to which I added furniture appliques and re-finished in an antique white.  The rocking chair was found at a vintage shop for $25 (it used to be a neon yellow).  I added the furniture appliques to the rocker then painted and distressed it.  The bedding set and mobile were purchased new from eBay.  The canopy I made with a half round piece of plywood and L-brackets, with sheer fabric and trim simply attached around the edging of the board with a staple gun. The chandelier was designed by me and assembled by my hubby.  The table lamp, wall shelves, bulletin board, wall hooks, wood organizer box and wall cherubs were all old vintage pieces from flea markets and garages sales that I refurbished/painted for the room. It is amazing to see how much can be done on a a limited tight budget.  We started with a completely empty room and when we were finished it looked like we had spent thousands.


The chandelier above is dripping with teardrop crystals and petite pink roses.  I designed it from scratch using a combination of both vintage and new lamp parts.  It is painted with Rustoleum satain spray paint in Heirloom White. My amazing hubby wired this beauty and hung it for me.  We added the ceiling medallion to add to the sweet cottage chic look.  We used silicone dipped light bulbs for a soft glow. The floral pillow on the rocking chair is from Target, from Rachel Ashwell's Shabby Chic line.  We later added a soft sage green, cream and rose colored area rug to the floor in front of the crib.
  
The bulletin memo board was made from a vintage frame, painted with the same Heirloom White spray paint, and has distressed edging.  I used a pretty pink floral girly fabric and lace ribbon in a criss crossing pattern across the front. This was an easy DIY project.  I had my hubby cut a piece of fiber board the size of the inner frame..  I added a layer of batting, wrapped the fabric around it and used a staple gun to fasten everything to the rear of the board.


This post has been shared at the Weekend Wrap Up Party over at Tatertots & Jello
 
and at Miss Mustard Seed.

Sweet Dreams Baby Girl !!!